 Generally in Windows XP there are several editions in market like home edition,student edition,professional edition etc.Some time installation is frustrating for users due to different version of installation disc.Microsoft fixed this issue in windows vista by offering single disc to all versions of vista operating system.
Showing posts with label "Windows 7 for Beginners". Show all posts
Showing posts with label "Windows 7 for Beginners". Show all posts
January 20, 2010
Tips to Create Windows 7 Univarsal Disk-Remove Versions
Generally in Windows XP there are several editions in market like home edition,student edition,professional edition etc.Some time installation is frustrating for users due to different version of installation disc.Microsoft fixed this issue in windows vista by offering single disc to all versions of vista operating system.
January 2, 2010
How to Enable Sidebar in Windows 7
Windows 7 sidebar with gadget stops working if User Account Control (UAC) is
disabled as shown below. Microsoft may have done this to prevent users from
installing any malicious unsigned desktop gadget in windows.
But here I have given a solution to make Windows7 sidebar with gadget to work
when UAC is disabled or turned off.

Step 1: Click on Start Menu go to Run type regedit and Hit Enter.

Step 2: In the Registry Editor follow the below navigation path
i.e HKEY_LOCAL_MACHINE\SOFTWARE\Microsoft\Windows\CurrentVersion\Sidebar\Settings


Step 3: Right Click on right side of Registry editor. Click on Create A New DWORD(32 Bit
Value) with name “AllowElevatedProcess” and set value to “1”.


Step 4: Exit registry editor. Then Right click on desktop and Click on add desktop
gadgets. as shown in figure below

Now Your Desktop Gadgets and sidebar will be Enabled.
December 29, 2009
How to Disable Program Compatibility Assistant in Windows 7

window 7 user and you must have notice the notification of Compatibility Assistant popping up constantly can be annoying. It really created the problem while doing the work fast. If you have administrator rights on computer , you can disable this annoying popup.
The error like this ....
Steps of Disable program Compatibility Assistant in Window 7 along Window Vista
1. Click Start button and type in Search Box "services.msc" like in the image

2. Window appeared and see the list and scroll down to "Program Compatibility Assistant Service" and click Stop

3. You will see the Service control screen that show the process bar.
I will not recommend home users to disable this option, Might be, they will get troubled for doing these steps. Questions and suggestions are welcome
December 16, 2009
Download Free E-Book Windows 7 Tips & Tricks
The e-book ‘Windows 7 Tips & Tricks’ is a compilation of one of the finest Tips n Tricks about Windows 7. It contains more than 50 Tips and tricks and you can use them to enrich the Windows 7 Desktop experience of yours


No doubt that Windows 7 is Microsoft’s most exciting Windows version in years. If you love this new operating system and want to go a step further for the Experience provided by this wonderful OS, this e-book is for you.
Download the e-book (pdf) free at source
December 11, 2009
Easily Change LoginScreen With Thoosje Windows 7 Loginscreen Editor
 Thoosje Windows 7 loginscreen editor is a free tool for changing Windows 7 login screen. It comes with a library of free login screen background images and you can also use your own images for login screen.
The program has a built-in function for controlling the image size limit (246KB) of login screen, so you can use any image as background.

Moreover you can reverse the settings back to the previous or the original loginscreen at anytime just with a click.
Download Thoosje Windows 7 loginscreen editor.
Download 15 new popular official themes, wallpaper and desktop gadgets for Windows 7
Microsoft has made available few more themes for Windows 7 that you can downloaded from the Windows 7 theme page.

A theme includes a desktop background, screen saver, window border color, and sound scheme.
To download a theme, just visit the official theme page click the Download button, and then click Open. The theme is applied to your desktop and added to Personalization in Control Panel.

You can also download wallpapers and desktop gadgets for Windows 7 from the theme page.
Download Cool National Geographic Theme for Windows 7
To spice up your Windows 7 desktop, here is a new theme pack compiled from high quality National Geographic photographs.

The National Geographic Theme for Windows 7 consists of 12 select wallpapers from the Official National Geographic Wallpaper Website released in 2007, 2008 & 2009. Interested users can download it free from here
Official Windows 7 themes can be downloaded from Microsoft’s personalization gallery. Users who want to create their own Windows 7 theme this tutorial may help.
Users who want to download National Geographic wallpapers, this wallpaper downloader specially designed for downloading wallpaper from Nat Geo website can help.
December 3, 2009
How to Pin Flip 3D Icon to Windows 7 Taskbar

Flip 3D is a feature for Windows 7 and Vista that allows users to easily identify all open windows just with a click. This is very useful if you have many windows opened at a time.
Flip 3D can be activated (if aero enabled) with a shortcut key Windows Key+Tab. But if you prefer to activate this with mouse (desktop icon), there are two options that you can choose.
One is a free software tool (see here for details) and other is a manual method created by Windows7news. Below is how to create a shortcut icon for Flip3D and pin to taskbar.
1. Right-click on the desktop and select New, then Shortcut.
2. In the location field, enter C:\Windows\System32\rundll32.exe dwmapi #105 (assuming that Windows is installed on C:)

4. Right-click on this new shortcut icon, then click on Properties.
5. Now click on the Change Icon button and in the ‘Look for icons in this file’ field type %SYSTEMROOT%\system32\imageres.dll, and press Enter.

6. Select the first icon and then click on OK, then click OK to finish the job.
7. Now drag this Window Switcher icon from your desktop onto the taskbar.
Related
http://windows7news.com/2009/11/01/adding-flip-3d-to-the-windows-7-taskbar/
Easily Record Troubleshooting Steps In Windows 7
If you have ever called for or been on the receiving end of a tech support issue, the most essential information you can have is a walk through on how to produce the issue at hand. Rather than typing them out by hand or trying to walk someone through it over the phone, Windows 7 has a nifty tool called the Problem Steps Recorder you can use.
Click Start, type PSR.EXE and press ENTER. This starts the Problem Steps Recorder.
Click the Start Record button and continue the steps to reproduce the problem/error. You can also add comments then and there, by clicking the Add Comment button. Once done, click the Stop Record button. Mention the output file name and save the file.
The output is an MHT (Internet Explorer all in one file) with details and screenshots of the actions the user performed. You can then send this file off to whomever needs it and they instantly have the steps to reproduce.
Click Start, type PSR.EXE and press ENTER. This starts the Problem Steps Recorder.
Click the Start Record button and continue the steps to reproduce the problem/error. You can also add comments then and there, by clicking the Add Comment button. Once done, click the Stop Record button. Mention the output file name and save the file.
The output is an MHT (Internet Explorer all in one file) with details and screenshots of the actions the user performed. You can then send this file off to whomever needs it and they instantly have the steps to reproduce.
December 1, 2009
How to Mount a Virtual Hard Disk in Windows 7
With Windows 7, you now have some cool options for backing up and restoring your computer. I’ve previously written about backing up your computer using the built-in backup tool in Windows XP, but the new version is way better.
In Windows 7, when you perform a backup of your computer, the backup software will create a virtual hard disk file (VHD). If you have used Virtual PC 2007 before, you’ll know what I’m talking about.
You can also read my previous post on how to convert your PC into a virtual machine easily. Once you have a VHD file of your PC, you can load it up in Windows 7 and access the data just as if it was another drive on your computer.
Note that you can also use that VHD file to restore your entire computer to a previous state, but what if you just need some files or folders from a backup? Mounting a VHD backup in Windows 7 makes it really easy to copy data back and forth from the virtual machine.
To mount a VHD in Windows 7, you have to open Computer Management by clicking on Start and typing in compmgmt.msc in the search box. You can also go to Control Panel, then System and Security, then click on Administrative Tools and then click on Computer Management.
Now click on Disk Management on the left hand menu and wait for the list of drives and partitions to show up. Next, right-click on Disk Management and choose Attach VHD.

In the dialog box, go ahead and click Browse and navigate to the location of the VHD file that you want to mount. Then click OK.

Once it has finished mounting, you will see it display as another Basic disk that is colored a light blue. At anytime, you can right-click on that disk and choose Detach VHD to un-mount the machine.

That’s pretty much it! It’s really easy and works very well in Windows 7! If you created a virtual machine (VHD) file from another program like Virtual PC or something else, it will mount in Windows 7. Enjoy!
How to Create a Network Map in Windows 7
cool new feature of Windows 7 is dynamic networking mapping.
Basically, instead of buying or downloading a network mapping software tool, you can do it from within Windows 7 itself.
You can quickly create a network map that includes all computers and devices connected to the same network.
To create your own network map, click on Start, then Control Panel , then Network and Internet, and finally Network and Sharing Center.
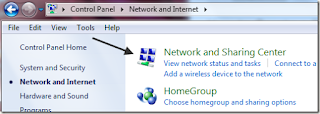
Now you’ll see some basic information about your current network connection, such as the wireless network you’re connected to, etc.
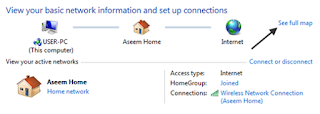
Now click on the See full map link at the top right. Wait a few second while the network map is being dynamically generated.
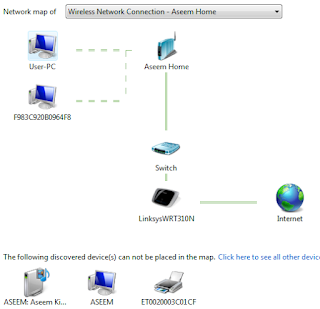
Pretty neat right! As you can see, I have two PC’s connected to my wireless network, which is called Aseem Home. In reality, the wireless router is called Linksys WRT310N and it’s also connected to a switch, which connects to the Internet.
Other devices like my wireless printer and Xbox 360 show up, but are not added to the map. You can click on “Click here to see all other devices” to get a break-down of everything else on the network.

At the top, you can also choose which connection you want to create the network map for in case you have multiple network adapters on your computer. It’s not as fancy looking as a professional software app, but it’s free and works fairly well! Enjoy!
Basically, instead of buying or downloading a network mapping software tool, you can do it from within Windows 7 itself.
You can quickly create a network map that includes all computers and devices connected to the same network.
To create your own network map, click on Start, then Control Panel , then Network and Internet, and finally Network and Sharing Center.

Now you’ll see some basic information about your current network connection, such as the wireless network you’re connected to, etc.

Now click on the See full map link at the top right. Wait a few second while the network map is being dynamically generated.

Pretty neat right! As you can see, I have two PC’s connected to my wireless network, which is called Aseem Home. In reality, the wireless router is called Linksys WRT310N and it’s also connected to a switch, which connects to the Internet.
Other devices like my wireless printer and Xbox 360 show up, but are not added to the map. You can click on “Click here to see all other devices” to get a break-down of everything else on the network.

At the top, you can also choose which connection you want to create the network map for in case you have multiple network adapters on your computer. It’s not as fancy looking as a professional software app, but it’s free and works fairly well! Enjoy!
November 19, 2009
Windows 7 Shortcut keys
There are many computer users who prefer operating the computer through keyboard more often than using it with the Mouse. So if you also belong to this category or just wish to know the added keyboard shortcuts in Windows 7, then here is the info.
Here is a list of some useful and unknown Keyboard Shortcuts for Windows 7
Key strokes used from Desktop
1. Windows Key + Tab = Aero (Switch windows using tab key)
2. Windows Key + F = Search (to search or find)
3. Windows Key + R = Run (to use Run box)
4. Windows Key + E = Explorer (Launches Explorer)
5. Windows Key + L = Lock (Locks the Computer)
6. Windows Key + X = Mobility Center
7. Windows Key + P = Projector
8. Windows Key + S = Launches the OneNote Screen Clipping Tool (yes it requires Office One Note)
9. Windows Key + D = Show and Hide Desktop
10. Windows Key + T = Cycle Super Taskbar Items
11. Windows Key + M = Minimize All Windows
12. Windows Key + Up = Maximize the opened Window
13. Windows Key + Down = Minimize the opened Window
14. Windows Key + Left = Tile Current Window to the Left
15. Windows Key + Right = Tile Current Windows to the Right
16. Windows Key + = = Magnifier
17. Windows Key + # = Quicklaunch
18. Ctrl + Alt + E = My Computer
19. Windows Key + 1 = Launches first application on taskbar (2 launches second, 3 launches third and so on)
Key strokes used from Explorer
1. Alt + Up = Go up one level
2. Alt + Left = Back
3. Alt + Right = Forward
While some of the shortcuts are similar to that present in XP, some are new and unknown.
Did I miss any shortcut you know? Share it with me.
November 13, 2009
Get Windows 7 USB/DVD Download Tool

If you are going to purchase windows 7 OS from Microsoft Store, then microsoft provides you option to download an ISO file or compressed files. The Windows 7 USB/DVD Download tool allows you to create a copy of your Windows 7 ISO file on a USB flash drive or a DVD. To create a bootable DVD or USB flash drive, download the ISO file and then run the Windows 7 USB/DVD Download tool. Once this is done, you can install Windows 7 directly from the USB flash drive or DVD.
The ISO file contains all the Windows 7 installation files combined into a single uncompressed file. When you download the ISO file, you need to copy it to some medium in order to install Windows 7. This tool allows you to create a copy of the ISO file to a USB flash drive or a DVD. To install Windows 7 from your USB flash drive or DVD, all you need to do is insert the USB flash drive into your USB port or insert your DVD into your DVD drive and run Setup.exe from the root folder on the drive.

System Requirements:
→ Windows XP SP2, Windows Vista, or Windows 7 (32-bit or 64-bit)
→ Pentium 233-megahertz (MHz) processor or faster (300 MHz is recommended)
→ 50MB of free space on your hard drive
→ DVD-R drive or 4GB removable USB flash drive
You can download Windows 7 USB/DVD Download Tool from here.
November 11, 2009
How to Install Windows 7 From USB Drive
In this tutorial I will show you way how to install Windows 7 from USB drive. Before follow this tutorial, make sure you have at least a 4GB USB flash drive, Windows 7 installation DVD and WinToFlash software. why do I use this software, because this software is very easy to use and simple (no instalation require). WinToFlash software will help you to install windows from flash. something else need you check in your computer is your PC support boot-up from USB drive or not. you can see this option in computer bios.
Installing windows 7 from USB drive have some advantages are you don’t need to worry if the DVD drive cannot read the disc if there is any scratches on the Windows 7 installation DVD, it is more convenient to carry around your USB flash drive rather than a DVD disc, you still able to install Windows 7 Althought the PC doesn’t even have a CD/DVD drive.
Creating Windows 7 instalation USB drive
There is a software called WinToFlash that does everything above automatically. All you need to do is run the program, set the location of the Windows 7 installation disc and the destination of your USB flash drive.
- Download WinToFlash software. I recommend to use the latst version.
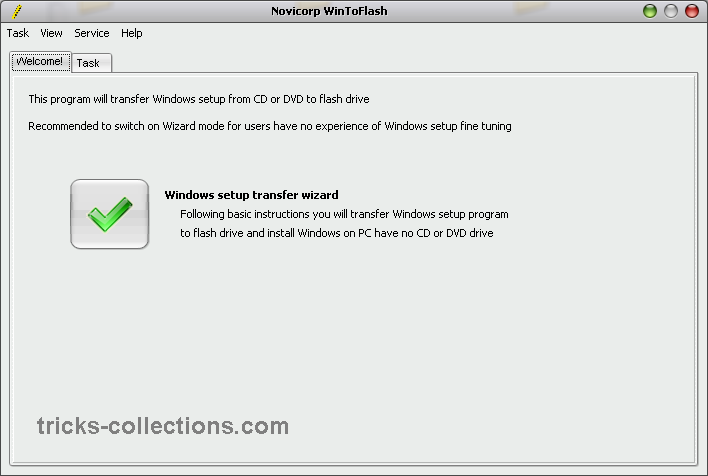
- Extract download file and then go to ectracted folder. run WinToFlash.exe then Click the “big check button” to start Windows setup transfer wizard.
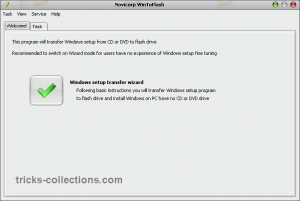
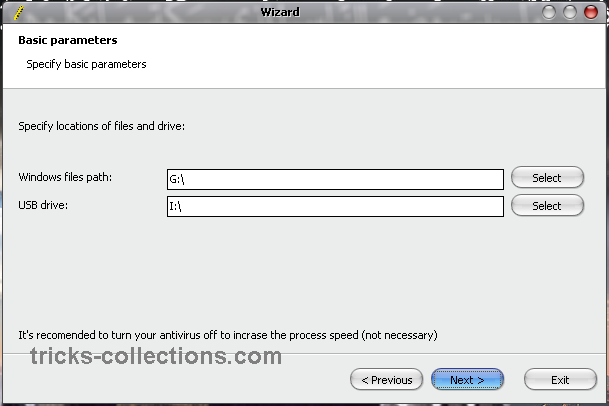
- Click Next then Specify the locations of Windows 7 instalation DVD and USB drive then click Next (The Windows 7 instalation DVD is the drive letter of your Windows 7 DVD drive and the USB drive is the drive letter of your USB flash drive)
- Select “I Accepted the terms of the license agreement” and click Continue.
- Click OK to start formatting your USB flash drive and the files will be automatically transferred from Windows 7 instalations DVD to USB flash drive.
- Click Next when finished copying.
Now How to Install Windows 7 from USB drive
Boot up the computer from USB flash drive. You will need to go into BIOS setup and set to boot from flash devices (USB device). If you got it right, the Windows 7 installation should load from your USB flash drive and install the Windows 7 like installing windows 7 from DVD drive.
http://tricks-collections.com/how-to-install-windows-7-from-usb-drive
November 4, 2009
Access Gmail from the taskbar-Windows 7

Windows 7 classic start menu
Classic start menu – For those prefer to use the old classic start menu, you guys can choose to install this little application called CSmenu.

Gmail Notifier Plus
Access gmail from Gmail from the taskbar – This is a good software for those using gmail, Gmail Notifier. It will alert you at your desktop, each time you receive a new email.

7Stacks
Stack your icon and folder neatly – Another great piece of software that allow you to stack up your folder neatly. StandaloneStack and 7stacks

Ninite easy pc set up
Install all your prefer application at once – Head over to this site ninite choose the appplication you want and then download the installer to your computer. This will save you a lot of time in installing each application individually.
November 2, 2009
Which Edition of Windows 7 Should You Buy?
It should be a simple choice – you either take the plunge and upgrade your computer to Windows 7 or continue with your existing operating system. And yet, as is often the case, the choice is not as easy as it sounds because once you decide to upgrade to Windows 7, you will also have to choose the right edition of Windows 7 that will fit your needs.

Windows 7 comes in six different flavors – Starter, Home Basic, Home Premium, Professional, Enterprise, and Ultimate. Now picking the right edition from these six variation may seem like a daunting task but in reality, you’ll have only three Windows 7 editions to choose from. Here’s why:
Which Windows 7 edition is not for me?
The Windows 7 Starter edition is meant for basic computing tasks (like checking email, web surfing, etc.) and is optimized for less powerful machines like your Atom powered netbook. You won’t find Windows 7 Starter at the retail stores as it will only ship (pre-installed) with new notebook computers worldwide.
Windows 7 Home Basic is not as limited as the starter edition but it will be only sold in developing countries like India, China, Philippines, etc with new computers. Then you have the Windows 7 Enterprise edition which is just like Windows 7 Ultimate but for businesses who go for volume licensing.
None of the above mentioned editions of Windows 7 will be available for general retail in boxed offerings. Your choice is therefore simplified to the remaining three editions – Windows 7 Home Premium, Professional, and Ultimate.
Compare Windows 7 Home Premium, Professional and Ultimate editions
The various editions of Windows 7 are designed such that each version has all the features of the previous editions plus something extra that makes that edition unique. Also, you can use the Anytime Upgrade feature to purchase a serial key online and upgrade your existing Windows 7 license to a more advanced edition. For instance, if you decide to buy Windows 7 Home Premium today, you can use Anytime Upgrade and shift to Windows 7 Professional or Ultimate edition anytime.
To help you decide which edition of Windows 7 to buy, here’s a quick rundown of features that are available in each of the Win 7 editions.
Windows 7 Home Premium
Windows 7 Home Premium, like XP Home and Vista Home Premium, is for home consumers worldwide with a very pleasing Aero glass user interface. Home Premium edition includes Windows Media Center to help you play a wide variety of multimedia formats (including DVD) and there’s a built-in DVD maker to create DVD movies or for burning files and disk images to CD, DVD, and Blu-ray disks directly from Explorer.

Windows 7 Home Premium also includes a backup utility that can create full system images (so you save a copy of everything that is currently on your computer). It also includes the “Previous Version” functionality that was earlier available with Vista Business edition only. This feature is very useful for retrieving files that you may have just deleted or changed accidentally.
Windows Virtual PC now supports all editions of Windows 7, whereas Virtual PC 2007 only supported XP Professional and Vista Business or Ultimate editions. With Virtual PC, you can run another operating system (like Windows XP, Vista or even Linux) on top of Windows 7 if you wish to do so. Finally, Windows 7 Home Premium supports up to 2 physical processors with unlimited cores, and up to 16 gigabytes of RAM.
Windows 7 Professional
Windows 7 Professional includes all the features of Windows 7 Home Premium, and then adds some advanced networking features. For instance, the Location Aware Printing feature lets you choose different default printers for different networks and is useful for people who use the same laptop in multiple locations – for example, at work and at home.
The "offline files" feature of Windows 7 Professional caches the network files to your local drive so you can continue working even if the network connection get dropped. The built-in Windows Backup tool can backup your data to the network and you may use the encrypted file system to better protect files on the computer. Windows 7 Professional features Domain Join that lets you connect to company networks more securely and access can be managed through group policy from the Windows server as well.
Like Vista and XP Professional, Windows 7 Professional also includes remote desktop feature that enables others to connect to your Windows 7 computer across the Internet from virtually any computer.

That said, the most interesting feature in Windows 7 Professional is XP Mode. In simple English, if you buy Windows 7 Professional or Windows 7 Ultimate, you get a fully licensed version of Windows XP that will run inside Windows 7 through Virtual PC. The XP mode is primarily for business users who want to run legacy apps in Windows 7 that otherwise only work with Windows XP.
The amazing thing is that Windows Virtual PC + XP Mode enables you to run XP software programs inside your native Windows 7 desktop – that means you can run legacy XP programs just like any other Windows 7 compatible program.
XP Mode for Windows 7 Home Premium
If you are a Windows 7 Home Premium users but also own a licensed copy of XP, you can use Virtual PC to make your own XP mode. However, if you do not already own a copy of XP for this purpose, you will likely come out cheaper by simply buying Windows 7 Professional if you wish to use this feature.
Windows 7 Ultimate
Windows 7 Ultimate includes all the features of Windows 7 Home Premium and Professional, plus some extra enterprise and security related features. Ultimate also lets you use multiple languages on the same PC.
The enterprise-centric features include Federated Search (for searching across network drives), Direct Access (you can access corporate e-mail servers, shared folders, or intranet Web sites securely without connecting to a VPN), BranchCache (it caches local copies of content from Web and file servers to improve performance) and a system that lets you run UNIX applications on Windows.
With Windows 7 Ultimate, you get the ability to boot from a virtual hard drive and the new BitLocker-to-go feature lets you encrypt files on your computer as well as removable disks like that USB flash drive.
Windows 7 Prices
While choosing an edition, price will be also a deciding factor for many users. Home Premium is the cheapest retail version of Windows 7, but it will also come as a Family Pack allowing you to use the same license on up to 3 computers in one home. If you have multiple desktop and notebook computers to upgrade, you will see significant savings from the Family Pack offer.
Windows Home Premium
- Windows 7 Home Premium Full: $199.99
- Windows 7 Home Premium Upgrade: $119.99
- Windows 7 Family Pack (Home Premium): $149.99
- Windows 7 Starter to Windows 7 Home Premium: $79.99
Windows 7 Professional
- Windows 7 Professional Full : $299.99
- Windows 7 Professional Upgrade: $199.99
- Windows 7 Home Premium to Windows 7 Professional: $89.99
Windows 7 Ultimate
- Windows 7 Ultimate Full: $319.99
- Windows 7 Ultimate Upgrade: $219.99
- Windows 7 Home Premium to Windows 7 Ultimate: $139.99
Related: Host a party, get Windows 7 DVD for free
Wait! Is my computer eligible for the upgrade edition?
While most retail sites are mentioning that only XP and Vista users are eligible for the upgrade pricing on Windows 7, the official word from the Microsoft Store is:
You qualify for Windows 7 upgrade versions if you are running genuine Windows Vista, Windows XP, or Windows 2000 on your PC.
And though you cannot do a direct in-place upgrade from Windows XP or 2000 to Windows 7 (where all of your existing software programs, files, and other settings are preserved), you can at least save some bucks from the upgrade pricing.
Windows 7 – 32 bit or 64 bit
Most new computers sold today have 64 bit processors. These processors support much greater amounts of RAM than 32 bit processors, and can also process more information at one time than their predecessors. With a 32 bit system, you are capped at using 4 GB of ram but with a 64 bit system, you can use virtually limitless amounts of RAM. To take advantage of these features, however, your Windows 7 operating system has to be 64 bit as well.
With previous versions of Windows, you had to decide at the time of purchase if you wanted the 32 bit or 64 bit version of the OS. Windows 7 has thrown that to the wind, and now both 32 bit and 64 bit versions will be part of the same box. You still have to decide which one to install but you don’t have to answer this question at the time of buying Windows 7.
Buying Windows 7
The mirage of Windows 7 product editions is actually not as bad as it looked initially. Windows 7 has improved Home Premium’s feature lineup, and then added some truly unique features to Windows 7 Professional and Ultimate.
The Home Premium edition should meet the requirements of most users but if you are a mobile professional who works from both office and home, Windows 7 Professional may be a better choice.
How to Remotely Control a Computer in Windows 7
If for some reason you wish to allow somebody remote access to your computer – or maybe you wish to still be able to control your computer remotely while you’re at work, I am here to teach you how to do it. So in this tutorial we will learn how to remotely control a computer in Windows 7.
1. First, we have to enable the Remote Connection. Click the Start button -> Control Panel -> System and Security. Under the System category, click Allow remote access:
2. In the new window, check the “Allow Remote Assistance connections to this computer” (or press R). Also check the box near “Allow connections from computers running any version“. Click Apply:
3. Now click the Advanced button and make sure that the “Allow this computer to be controlled remotely” is checked. Next, under the “Invitations” category, you can alter the time invitations remain open and also select to only allow remote connections from computers using Windows Vista or later.
Here I would suggest to set the invitation time to 15 minutes if you’re giving remote access to anybody else but you and a few hours for an own invitation. It might also be a good idea to check the option to only allow Vista running systems to connect – in theory, there should be no problems with XP versions remotely controlling the computer, but you can never know…
4. Optional step if there is a router present: you will have to configure the router to allow connections on a port of your choice (for example, 49155). Refer to your router’s manual to learn how to do that. Also, if you have a firewall present, it might be needed for you to allow connections to the same port (as in our example – 49155).
5. Now your computer is available to be remotely controlled. Just have in mind that only one connection is possible at one time. In order to connect to a Remote Desktop in Windows 7, you will have to click the Start button -> All Programs -> Accessories -> Remote Desktop Connection:
6. When the program launches, simply type in the IP address of the computer you want to control remotely and click on Connect:
How to Change the Default Program a File Opens with in Windows 7
Sometimes a program you install makes it the default program that launches specific file types, other times you simply wish to open a specific file type with a different program (for example, a .JPG file that can be opened with Paint, Windows Photo Viewer or IrfanView). In this tutorial, we will learn how to change the default program a file opens with in Windows 7.
1. First, browse to the file type you want to change the default opener for – in this tutorial I will use a .JPG file, but you can follow these steps for any type of file.
2. Next, right click on that file and click on “Open with“. If there are already more programs that can handle that file extension, as in my case, a new window will appear and you’ll have to click on “Choose default program“:

3. In the new window, first click on the small arrow pointing downwards near the “Other programs” section and see if the program you want to open the file type with is listed there. If it is not, click on the Browse button and select the program from its install location. Make sure to have the “Always use the selected program to open this kind of file” option checked, and click OK:

4. Congratulations! The file has now been opened with the program you have chosen and all files with the same extension will now be opened with the same program.
How to Change User Account Control (UAC) Levels in Windows 7
Windows Vista owners had a pretty rough time with the UAC (User Account Control) but Microsoft learned from their mistakes, listened to the feedback from users and decided to drastically change things around. As a result, Windows 7 has a better, faster and less annoying UAC. However, this doesn’t mean that it can’t get customized even further, and that’s exactly what we’ll learn in this tutorial: how to change UAC levels in Windows 7.
But first, let’s see what is this UAC, after all!
The User Account Control is a Windows 7 feature (also found in Vista) that deals with security issues and has the only goal to protect the user from threats. And since most of the threats will start with making changes to your system, the UAC tries to prevent them by asking for permission for any application that tries to make any changes to the system. And even though this is an amazing feature, it can get a bit annoying…
So… how to change UAC (User Account Control) levels in Windows 7?
Unlike Windows Vista that had just two options for the UAC control (on or off), Windows 7 offers four security levels annoyed users can choose from in order to reduce the annoyance level. In order to start making changes, we have to head over to the UAC settings.
Click on the Start button -> Control Panel -> System and Security. Under the Action Center category, click on Change User Account Control Settings:
The levels of the UAC can be controlled via a slider that can be set to: Always notify, Notify only when programs try to make changes (the default value), Notify me only when programs try to make changes to my computer (do not dim my desktop) and Never notify (aka turn off):

Now, in order to change the level of the User Account Control, you have to move the slider up or down to the desired level. When you are satisfied with your choice, press OK.
What UAC level should you choose?
If the UAC prompts tend to annoy you, it is the Notify me only when programs try to make changes to my computer setting you should go for (one level down from the default setting). In this case, the UAC prompt won’t dim the desktop and you will be allowed to continue doing whatever you were doing before the prompt appeared.
However, in such a case, it might be possible to accept or deny some programs by mistake, since it won’t be completely clear that a UAC prompt will appear. The risk of that happening is low, though, and if you’re willing to take it, this level might be the best choice for you if the prompts tend to annoy you.
On the other hand, if you have nothing against the prompting windows and the desktop dimming and you also want to keep your computer as secure as possible, you will wish to go for the Always notify setting since it is, after all, the safest!
Should you turn off the UAC in Windows 7?
No, unless you are an experimented user. With the User Account Control turned off, you will most certainly get some type of malicious software on your computer, sooner or later, even if you have an antivirus program installed. And having to reinstall the OS all over again, and maybe even lose important data is probably much more annoying than having to allow or deny access for programs regularly
How to Disable Internet Explorer 8 Accelerator Add-ons
The Accelerators are a pretty neat idea introduced in Internet Explorer 8, but unfortunately they can become quite annoying, especially when using the e-mail client. Fortunately, in this tutorial I will show you how to disable (and re-enable, if you wish) the Internet Explorer 8 Accelerator Add-ons.
1. Launch Internet Explorer 8 and click the Tools tab and select “Manage Add-ons“:
2. In the new window, under “Add-on types” click on Accelerators. All of them (blog, e-mail etc) will be listed to the right:
In order to disable any accelerator in Internet Explorer 8, simply click on it and then click on the Disable button as shown in the screenshot above.
If you wish to re-enable an Accelerator, simply follow the same steps as above but instead click on the “Enable” button which becomes available for all disabled IE8 Accelerators.
NOTE: Some users, even after disabling the accelerators (especially the e-mail one), still get annoying blue boxes in the middle of their e-mails. If this is happening to you, you can completely remove the accelerator by clicking the Remove button. And voila! No more annoyance!
Subscribe to:
Posts (Atom)