When Canon Pixma iP1700 subjected to reset using resetter tool. First case, My Canon pixma Pixma ip1700 becoming Canon Pixma ip1300 after resetting the EEPROM, second case, cartridge not recognize after resetting the counter then the led blinking 5X orange and 1X green..
Problem 1.
My Canon Pixma ip1700 becoming ip1300
My Canon Pixma iP1700 becoming canon Pixma iP1300, this problem happened after resetting the eeprom of Canon iP1700 using iPtool.
The solutions for this problem:
• Install driver for canon iP1300, you can download the driver in the canon website.
• Now run iPtool software, auto recognize as Canon Pixma iP1300
• In the change model set the printer to iP1700.
• In the EEPROM Operations click reset button. Turn off the printer and turn on again, the problem solved now your Canon printer becoming Canon Pixma iP 1700 again.
Problem 2.
Blinking orange 5x and green 1x and the color/black cartridge not recognized
This problem appears after several times reset ink level the cartridge. If this reset method does not work to solve the problem. I get this solution after several times try resetting using various combinations button.
Solutions for the problem are:
• Start with printer off
• Hold down Resume button and press Power button.
• Keep holding down Power button and press Resume 2 times, then press and hold the resume button, release power button.
• Green lights will flash and then stop blinking (Keep hold the resume button).
• When green lights are solid, release resume button and press again the Resume button 4 times.
• Don’t switch of the printer (because if your turn off and turn on again the printer the problem still appears), Now reset the counter and EEPROM canon iP1700 using iPTool software (recommended).
• Turn off and turn on again the printer, the printer should respond as normal. In my Canon iP1700 problem solved.
November 30, 2009
TweakNow WinsSecret Reveal Hidden Secrets of Windows 7, Vista and XP
Windows is very customizable operating system. From looks and feels to performance and stability can be configured to suit your personal taste. Unfortunately most of the configuration settings are not available in Control Panel and we must be configured manually through a registry editor and unfortunately registry is not user friendly for most people.
The registry is a special file in your hard disk that holds most of Windows settings data. Changing a wrong value in the registry may cause your Windows Operating system error. This is why novice users should not edit registry value directly using a registry editor by them self. To help non technical users configured their Windows like geeks do, we can use TweakNow WinSecret.
TweakNow WinSecret is a free windows tool to optimize all windows 7/Vista/XP registry setting and provide easy and safe user interface that let you fine-tune every aspect of Windows Operating System and Web browser.

How to use TweakNow WinSecret
Tweak-Now-Win-Secret-2009
1. Run the software
2. Click “Windows Secret”
3. On the Right Windows select the windows feature to be optimized.
TweakNow WinSecret are divided in 11 sections are:
Applications, Control Panel, Desktop, Miscellaneous, Network & Internet, OEM Info, Special Folders, Start Menu, User Accounts, Windows Core, Windows Explorer
 Download
Download link and more info about Tweak Now WinSecret open following website: http://www.tweaknow.com/powerPack.html
How to Save Printer Ink -InkSaver Software

InkSaver 2.0 allows you to control the amount of ink used by your inkjet printer, making your ink cartridges last longer. Using patented software algorithms, InkSaver optimizes printer data so that your printer uses less ink – even when printing at your inkjet’s highest resolution.
InkSaver lowers your ink consumption and can extend the life of your ink cartridges by up to 4 times. Unlike printing in Draft mode, InkSaver gives you control over your ink without compromising print quality, regardless of whether you are printing in best, normal or draft mode.
But this software not free.
InkSaver 2.0.5 Trial Version

Download Now (4.51MB)
Tested spyware free Yahoo Messenger Shortcut Keys
Yahoo Messenger is one of the most user IM clients in the world, and many users use it for to IM at work, IM with friends and family and more. Yahoo messenger has several shortcut keys, using which you can buzz a person; add emoticon/smiles to your messages and more.
These Shortcut Keys will help you to Chat Fast.
General Use Shortcut Key
• Windows Key + Y – Bring Yahoo Messenger to Focus, works even if Yahoo Messenger is sitting in the system tray.
• Ctrl + G – Buzzes the contact you are chatting with.
• Ctrl + H – Show or Hide offline contacts in main messenger Window.
• Ctrl + Shift + P – Open preferences window.
• Ctrl + M – Provides a option to send a Instant message.
• Ctrl + T - Provides a option to send a SMS message.
• Ctrl + L – Provides a option to make a call.
• Ctrl + K – Provides options to call a phone number.
• Ctrl + Y – Send a email message.
• Ctrl + Shift + A – Provides options to add a contact.
• Ctrl + Shift + 0, 1 or 2 – Switches between different messaging formats provided by
Yahoo Messenger 9 and above.
• Esc key – Closes a active message window.
• Ctrl + D – Sign out of Yahoo Messenger.
• Ctrl + Shift + D – Sign out of Yahoo Messenger client and sign in to your mobile device.
• Ctrl + Shift + F8 – Change your display Image.
• Ctrl + Shift + C – Send you contact info in a active chat window.
• Ctrl + Shift + M – Send you messenger friend list in a active chat window.
• Ctrl + Shift + R – Request contact details in a active chat window.
Messaging Window Editor Shortcut Keys
• Ctrl + B – Toggle bold on or off, or convert selected text to bold.
• Ctrl + I - Toggle italic on or off, or convert selected text to italic.
• Ctrl + U - Toggle underline on or off, or convert selected text to underline.
Addition to this some Emoticons which are not even available from Yahoo Messenger and requires you to use keyboard shortcuts.
How to optimiZe Windows System Performance-DiskMax
DiskMax Optimizes Windows System Performance by Removing Unused Junk Files. Junk files can make computer no longer feels as fast as it did when we first got it. By removing junk files can increase performance of windows system.

With Diskmax deleting junk files from computer will be made easy. DiskMax is free and is compatible for Windows XP, 2003, Vista and even Windows 7 and it Designed in user-friendly interface and is easy to be used, it is bundled with 3 types of scan profiles namely Quick, Standard and Detailed.
Below features list of DiskMax:
- Automates emptying your recycle bin (if specified), cleaning up of installation remnants, and debugging information.
- Cleans up every user’s History, Temp, Temporary Internet Files, Cookies (if specified), Recently opened documents list, explorer thumbnail cache and windows error reporting logs.
- Clears out Windows cache, unused legacy cursors (on Vista, if specified), debugging info, internet logs, help center caches, repair information, DLL caches, Logs, temporary files and windows update roll-back files.
- Cleans up after Vista SP1/SP2 install (if specified).
- Removes registry entries for multiple Most Recently Used lists.
- Clears out Windows Vista event logs (no other application out there does this).
- Deep scans your hard-disk to remove all files of type log, old, prv, chk, swp, bak, gid, wbk, tmp and dmp. This can be cancelled if you are an advanced user who needs these types of files for immediate troubleshooting.
- Defragments your HDD(s) – basically rearranges files around so that they can be accessed faster.
- Displays a log of all the activities performed along with associated time stamps.

How to use DiskMax
- Its easy once download and install the software you can run the software.
- Select scan methode, Quick, standard or detailed. Quick mode only scan Recycle Bin and User Profile (level 0) and for standard and detailed will scan: Drive Root, Recycle Bin, User Profile, All Users, Windows Update, Event Logs, Deep Scan, Defragment.
- Once select one of the scan profile, DiskMax will start scanning your computer. A quick report is displayed at the end of each complete DiskMax run.
Download Now DiskMax (757.83K)
How to Backup and Restore Windows System-Macrium Effect

I often testing new software in my Desktop PC when my Windows system corrupted or infect by trojas or virus, I reinstall my Windows system. But now I use Macrium Reflect to backup and restore the Windows system.

Using Macrium Reflect We can create an exact image of partitions on hard disk for easy and restore the partition using the image files. The Images can be stored on local or network drives, CD or DVD media, and removable drives.

There are two version of Macrium Reflect,full version and free version. Macrium Reflect free version can be used only on Windows Xp and Vista or Windows 7, 32 and 64 bit versions.
How to create image file of windows system with Macrium Reflect
• Open Macrium Reflect
• Click Backup menu and select Create Image.
• Click ‘Next’ to continue. • Select partitions where the windows system installed (generally on drive C). Then click next to continue.
• Choose the destination directory or CD / DVD burner for the backup image. Click next to continue
• The final dialog shows a summary of all selections in the backup wizard. Click “Advanced” to set further settings for this backup. Click “Finish” the Ok to start backup the Windows system.
• Wait until backup process finish. The backup file will be saved as .mrimg extension Now can create a bootable Rescue CD Bootable Rescue CD be used restore image of windows system.

Follow these steps to create bootable rescue CD.
1. Run again Macrium Reflect.
2. Click Other Tasks from menu bar then “Create Rescue CD”.
3. There two options but I would recommend you to select Linux and click Next.
4. Insert the Blank CDR disc and click “Finish” to burn the CD. Download the latest
Free version of Macrium Reflect.
Download Now (28.19MB)
Comparison of features of the free and full editions of Macrium Reflect. Visit link below
http://www.macrium.com/features.asp
Comparison of features of the free and full editions of Macrium Reflect. Visit link below
http://www.macrium.com/features.asp
How to change Pendrive Background just like your Desktop
Just Like your desktop, you can change your pen drive background and also hard disk drives background. This tricks only works for Windows XP.
Just Copy the below code to notepad, then save it as "desktop.ini"
[.ShellClassInfo]
IconFile=%SystemRoot%\system32\SHELL32.dll
IconIndex=127
ConfirmFileOp=0
[{BE098140-A513-11D0-A3A4-00C04FD706EC}]
Attributes=1
IconArea_Image="example. jpg"
IconArea_Text="0xFFFFFF"
VeBRA sources - don't delete the tag above, it's there for XXXXX purposes -
[ExtShellFolderViews]
{BE098140-A513-11D0-A3A4-00C04FD706EC}={BE098140-A513-11D0-A3A4-00C04FD706EC}
{5984FFE0-28D4-11CF-AE66-08002B2E1262}={5984FFE0-28D4-11CF-AE66-08002B2E1262}
[{5984FFE0-28D4-11CF-AE66-08002B2E1262}]
PersistMoniker=Folder.htt
PersistMonikerPreview=%WebDir%\folder.bmp

1. Where "example. jpg" is, delete that and replace with your picture name for example "redrose.gif"
2. Put "desktop.ini" and your chosen picture in your Thumb Drive then Hidden it.
3. Refresh and Enjoy with your new background.
4. You can also try on C, D, E F drives.
If you liked it please leave a comment
Create a Flash Movies From Powerpoint-iSpring
iSpring Create Interactive Flash Movies from PowerPoint in One Mouse Click
iSpring is a free PowerPoint add-in to convert PowerPoint file into Flash format.

This software will help you create interactive and high quality Flash movies from PowerPoint file just in one mouse click.
iSpring Free transfers accurately PowerPoint animation effects, slide transitions, hyperlinks, embedded Flash movies, audio, and video clips into Flash presentation. iSpring keeps original appearance of your PowerPoint presentations regardless of their complexity. This software works on Microsoft PowerPoint 2000, 2003 and 2007.
How to use iSpring to Flash Movie from Power Point file?
• Install iSpring, You can download the software from link above. Once installation finished you’ll see new menu called “iSpring Free” in the ribbon bar.
• Open PowerPoint file to be created video.
• Click Publisht button in iSpring menu then click publish to create flash movie.

After conversion to Flash format your presentation turns very compact, easy to distribute and share on web and compatible with all browsers and OSs. It can be viewed on computers without PowerPoint installed.

Download iSpring-Free PowerPoint add-in
How to Use Gmail as your Hard drive

Preparing the Gmail account for storage use. Step 1: If you do not have one yet, you need to sign up for gmail’s free email account at the Gmail website.
Step 2: Log into your gmail account. Click on the Create a filter button. A dialogue box wills pop-up. In the subject field, type in “GMAILFS” and click Next Step. Check the option that reads “Skip the Inbox (Archive it).” Click on Create Filter.
Step 3: You will now download the GMail Drive shell extension. (See resources below for the link). The download will likely be in zip format, so extract the files. Next, install the setup.exe file and follow the step-by-step instructions
Step 4: You can now view and access your new gmail drive by going to My Computer. To add files to this virtual drive, you will either copy or paste them, or right-click the particular file, click send to and select gmail drive
Installing the GMail Drive shell extension GMail Drive is a Shell Namespace Extension that creates a virtual filesystem around your Google GMail account, allowing you to use GMail as a storage medium. GMail Drive creates a virtual filesystem on top of your Google GMail account and enables you to save and retrieve files stored on your GMail account directly from inside Windows Explorer.
GMail Drive literally adds a new drive to your computer under the My Computer folder, where you can create new folders, copy and drag'n'drop files to.GMail Drive shell extension is a tool that creates a virtual filesystem. The first step is to download the software using the links found at the bottom of this page: Viksoe.dk or Softpedia
Once downloaded, simply extract the files and double-click on the Setup.exe program. When it has completed it will open a help file that you should read to get an understanding of how the program works. When done reading, simply open My Computer (or Windows Explorer) and you should see the Gmail Drive as shown in Figure 1 below.

My Computer with the Gmail Drive Using the Gmail Drive to store files Now that the software is installed, simply start copying files into the Gmail Drive. You can also right-click on files and select Send To -> Gmail Drive. When you start upload a file the extension will present a progress meter as shown in Figure 2 below.

Upload a file to the Gmail Drive When the file has completed uploading, the extension will enumerate the folder again and you will be able to see the files stored in the folder. If you want to delete a file, simply click on the file once to select it, and then press the delete key. Below is a figure of my Gmail Drive that I have been playing around with. Files stored on a Gmail Drive As you can see you can store a variety of file types and sizes and as long as you have the Gmail Drive extension installed a computer, you can access these files from anywhere.
Download
GMail Drive shell extension 1.0.15
How to increase diskspace-Fix low diskspace problem
Do you feel that the free space on your hard-disk is too little? Does it seem that something fishy is going on which is eating your hard-disk space? If your answer is yes, read on till end to uncover the secrets of this type of behavior.
Reasons for consumption of free space
1. Some of the key reasons are:
2. Temp files on C drive
3. Temporary Internet files
4. Backup files created during installation
5. Windows system restore data
6. Duplicate copies of large files like movies, songs etc.
7. Deleting Uninstall files for windows updates.
There are some more reasons as well, but these are most common reasons which can be observed. Now the important question, how to fix it ?ok read on for the solution.
Fix:
1. Deleting Temp files:
Temp files are the files which are created for some temporary purpose by many softwares. Go to Start > Run type “%temp” (without quotes) and press enter. This will open a Temp folder, at this folder,select and delete all files at this location. After this empty your windows recycle bin.
Note: You may not be able to delete certain files as they might be in use, but delete as many as you can.
2. Deleting Temporary Internet files and backup files:
There are several ways to do it, but we will tell you the most convenient way. Open My computer, right click on the disk drive , go to properties and click on Disk Cleanup.
Select the temporary Internet files; recycle bin, setup log files, temporary files, office setup files, and any other option which is not very important for you and Click OK. This will start the cleanup process and will delete the un-necessary files thus increasing the disk space.
Note:
Above two methods deals with removal of junk and temporary internet files which can also be removed automatically using software called Cleaner which can be downloaded from here.
What is CCleaner?
CCleaner removes unused and temporary files from your system - allowing it to run faster, more efficiently and giving you more HDD space.

Download [via]
3. Deleting old restoration data:
As a part of system restore utility, windows creates some check-points and saves corresponding data on each disk having restore feature. These files also consume significant space. You can delete all of them except the most recent restore point data if you feel that your computer is running stable for a long time and you may not need very old restore points. To delete it, open disk cleanup window as mentioned in previous step and click on More Options tab
Click on System restore clean up button as i have placed my Cursor on the above Screenshot. This will give a warning message, click yes to it. This will delete all old restoration points except the most recent one.
4 .Delete duplicate copies of large files:
Sometimes we have several copies of same documents, songs and even videos which consume lots of space un-necessarily. Finding them manually and deleting them is a real pain. But this work has been made very easy by double-killer. Its an intelligent utility which scans your drives for duplicate copies of files and gives you and option to delete them. You can download it from here for free.
5. Deleting Uninstall files for windows updates:
You can also delete some folders whose name starts with “$NtUninstall.” in the windows directory (for example C:\Windows) if C drive is the primary partition.
However, They are referring to prior hot fixes, so they should be safe to delete if your system is stable with the fixes applied after windows update, and you have no intention of uninstalling them.
How to increase Firefox 3 Loading Speed on windows
Mozilla’s newest browser version, Firefox 3.5, enjoyed huge support when it launched, breaking a world record in the process. With improved browsing features, Firefox 3’s performance over it’s earlier version Firefox 2 was plain to see. However, there was one issue that many users were starting to notice; the increased loading time when launching the browser.
This article will explain how to shorten the Firefox 3 load time, using free tools and your Windows command line.
Step 1:
Firstly, we will need to download a compression tool that will pack and reduce the size of your Firefox executable.
This tool is called UPX (The Ultimate Packer for eXecutables).
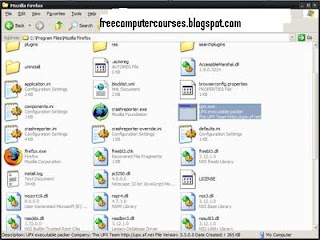
Once downloaded, extract the file upx.exe and copy it to your Firefox installation directory (typically C:\Program Files\Mozilla Firefox).
Step2:
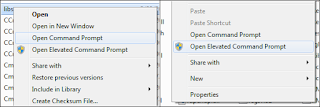
Close Firefox if you have it running. You will now need to open a command prompt window and change its path to the installation directory mentioned above. For those who are unfamiliar with the command prompt, there is help in a small file named Open Command Prompt Shell Extension.
Download Open Command Prompt Shell Extension.
This will allow you to open a command window from the folder in Windows Explorer (see screenshot below).
Step 3:
With the command prompt open and path changed, copy and paste the following script into your command prompt:
for %v in (*.exe *.dll components\*.dll plugins\*.dll) do upx “C:\Program Files\Mozilla Firefox\%v”
This command will execute the file packer which will compress your Firefox executable. Once it has finished, close all open browser windows and applications and re-launch Firefox. You should now notice an decrease in load time when starting your browser.
This tweak may be affected by any future updates to the browser but can be re-applied using the steps detailed above. Should you wish to reverse the process, you simply need to use the following script:
for %v in (*.exe *.dll components\*.dll plugins\*.dll) do upx “C:\Program Files\Mozilla Firefox\%v”
There are a few other tweaks you can employ to speed the launch of Firefox, namely uninstalling any unused Firefox Addons and changing your home page to a blank page using about:blank
Hopefully this tweak will allow you to improve load times on whatever computer you use. If you have any further tips on how to improve your Firefox load time, please leave a comment below.
This article will explain how to shorten the Firefox 3 load time, using free tools and your Windows command line.
Step 1:
Firstly, we will need to download a compression tool that will pack and reduce the size of your Firefox executable.

This tool is called UPX (The Ultimate Packer for eXecutables).
Once downloaded, extract the file upx.exe and copy it to your Firefox installation directory (typically C:\Program Files\Mozilla Firefox).
Step2:
Close Firefox if you have it running. You will now need to open a command prompt window and change its path to the installation directory mentioned above. For those who are unfamiliar with the command prompt, there is help in a small file named Open Command Prompt Shell Extension.
Download Open Command Prompt Shell Extension.
This will allow you to open a command window from the folder in Windows Explorer (see screenshot below).

Step 3:
With the command prompt open and path changed, copy and paste the following script into your command prompt:
for %v in (*.exe *.dll components\*.dll plugins\*.dll) do upx “C:\Program Files\Mozilla Firefox\%v”
This command will execute the file packer which will compress your Firefox executable. Once it has finished, close all open browser windows and applications and re-launch Firefox. You should now notice an decrease in load time when starting your browser.
This tweak may be affected by any future updates to the browser but can be re-applied using the steps detailed above. Should you wish to reverse the process, you simply need to use the following script:
for %v in (*.exe *.dll components\*.dll plugins\*.dll) do upx “C:\Program Files\Mozilla Firefox\%v”
There are a few other tweaks you can employ to speed the launch of Firefox, namely uninstalling any unused Firefox Addons and changing your home page to a blank page using about:blank
Hopefully this tweak will allow you to improve load times on whatever computer you use. If you have any further tips on how to improve your Firefox load time, please leave a comment below.
How to convert Adobe PDF files into Image formats -Fix

The tool is called Adolix PDF Converter and what it does is it will add a virtual printer to the system from where you can create a PDF file too by sending the print to this virtual printer from the applications like MS Word, Powerpoint etc.
Moreover you will be able to convert the PDF files to the image formats of either of all the pages or just the selected page. You can choose to transform the whole PDF file to image or only a selection of pages, defining a conversion pattern similar to how printing is done in MS Word.
PDF Writer benefits
- print from any application using a virtual printer.
- built-in PDF Splitter.
- built-in preview
- rotate pages
- encrypt PDF with a complex set of security options like password and 128 bit encryption
- merge multiple files into one PDF; print documents one by one
- change page order or delete pages from PDF
- modify colors and compression options for each document
- works with users with non-administrative rights on XP and Vista
- send PDF as attachment with your default email client
- export PDF pages as images. Whole document or just certain pages. Supported formats are BMP, JPEG and TIFF.
- multi-language user interface support including English,French and German
How to Check who is Invisible on Yahoo Messenger (YM)

How to Check who is Invisible on Yahoo Messenger (YM)
Have you ever wondered why a person in your contact list appears offline to you all the time? Now you can spy your buddy to see his real yahoo status. Use Yahoo Messenger Invisible Scanner to detect if a user is in fact offline or just invisible.
Use these Sites to check who is invisible in yahoo:
How to check all your e-mail Account from Gmail
Just about everybody these days has more than one email account, usually more than can be counted on one hand. Personally, I have 8+ accounts with different email service providers, including Yahoo, Gmail, Aol, hotmail, etc. Currently, I use Outlook to check all of my accounts from one client application since it makes it easier to manage.
If you’re ok with Outlook, then there’s not a problem. However, if you prefer to use Gmail for everything since it’s web-based and therefore not tied down to one computer like Outlook, then you might be interested in knowing how to setup all of your email accounts in Gmail so you can receive all emails via your Google Inbox.
So here’s how to setup Gmail as a master account for collecting email from all of your other online accounts:
First, log into your Gmail account and click on Settings at the top right corner.
Now click on the Accounts tab and click on Add another email account under the Get mail from other accounts heading.

Now you’ll be presented with a little pop-up window where you can enter in the email address for the account you want to add in. The cool thing about this is that you don’t have to sit there and worry about finding the pop and SMTP server names for your ISP, Google will automatically try to determine the servers for you based on the email address!
After I entered my email address, Google automatically determined the POP server name and the port number. All you have to do is enter in your password for the account.
You also have the option to leave a copy in your account, label the messages from the new account so you can sort them quickly, and to archive them directly so that they don’t show up in your Inbox.
Now the email accounts will be checked by Google on some periodic basis and the emails will be retrieved and stored according to your preferences. Unfortunately, you cannot set the time period for the email checking.
Even if you do not want to use Gmail as a catch-all account, it’s still a great way to backup all of your other email accounts, especially if you’re using Outlook. Just configure each new account to be archived automatically. That way, you can continue to check emails through Outlook, but it’ll all be backed up on Gmail too. If your computer crashes and you lose your Outlook data file, the emails will still be in Gmail!!! Enjoy!!!
Subscribe to:
Posts (Atom)