November 3, 2009

How to Change Mother Boards in Desktop?


Motherboards hold all the pieces that make up your computer. It supplies all the wiring and connections needed to make your computer run. However, you may feel that need to upgrade or replace your motherboard.
Before anything can be done, you need to be absolutely sure that you have to upgrade your motherboard. As a stand-alone part, motherboards are probably the part that would least likely need an upgrade. Some reasons for having to upgrade would be:
  • Not enough space for an adequate amount of RAM
  • No slot for an adequate graphics card
  • Damage to the actual motherboard
You then need to decide whether you want to keep the current parts of your computer, or buy completely new ones along with your motherboard.

Keeping the Same Parts

If you want to keep the same parts in you computer after purchasing a new motherboard, you need to start by looking at the parts you already have. In this way, you need to look for a motherboard that is compatible with your existing computer parts. This is essential because you do not want to buy a motherboard that is not compatible with any of the parts you already have.
You may not know what parts your computer consists of. To find this out:
  • Right click on 'My Computer'
  • Go to Properties
  • Go under Hardware
  • Click Device Manager
You can now see all the parts that your computer has. Remember to write these down for future reference.
After doing this, you can start looking for a motherboard. Sites such as Newegg are a great way to compare and contrast different models.
When looking for a motherboard, make sure that it has the following:
  • Enough RAM slots
  • A PCI slot that is compatible with your graphics card
  • A CPU Socket that is compatible with your CPU
  • Enough USB drives to comfortably fit everything you may want to plug in
  • Optional: Onboard sound to save some money and have a spare PCI slot
Once you have chosen a motherboard, be sure to double check that all existing parts fit.

Buying New Parts

If you want to completely upgrade your PC and buy new components along with you motherboard, you are effectively building a new computer.
All the parts that you choose must be based from your motherboard. Each part must be compatible with the motherboard you choose in order for your computer to run.
When buying a brand new motherboard, look for:
  • Enough RAM slots
  • A PCI Express slot for a good graphics card
  • A widely accepted CPU slot to increase your CPU model options
  • Optional: Onboard sound
Once you have purchased your motherboard, you are ready to install it.

Taking out the Motherboard

You will need just a screwdriver for the entire process
  1. First, disconnect all the wires behind your computer
  2. Start by taking out the largest wire that connects the power supply to the motherboard
  3. Move onto the smaller wires that are used for processes such as LED, Power Switch and Reset Button
  4. Take the larger ones out next: the wires running from the read/write drive and hard drive
  5. Open the case - you may need to use a screwdriver for this
  6. 'Ground' yourself by touching the large metal bar across the computer towards the top. Static electricity can completely destroy parts. Doing this gets rid of the static electricity in your body
  7. Start by taking off all the wires that are connected into the motherboard. You can move these wires to the side.
  8. The graphics card is located towards the bottom of the motherboard. There will most likely be a switch or latch where the graphics card extends to the back of the computer. Lift or switch this latch.
  9. Very gently, begin by pulling up the end of the graphics card is closest to the back of the computer. This side should lift up.
  10. There is a hook on the other end of the graphics card. Be aware of this when fully detaching the card. Lay the card to the side when you are done.
  11. You now have to take off the heat sink and fan located on the CPU.
  12. Detach the wire from the heat sink and fan from the motherboard.
  13. Depending on what model of CPU you have, you need to take off the heat sink and fan first. There should be a latch that you lift that will release both the heat sink and fan.
  14. You now need to take out the actual motherboard.
  15. There will be screw all around your motherboard. Unscrew these and you should be able to lift it up out of the computer relatively easy.
  16. Once you have the motherboard out, you need to take off the RAM and actual CPU.
  17. Lift the metal latch located above the CPU socket.
  18. Gently lift the CPU up and off the motherboard. You may need to move it from side to side a little to loosen it.
  19. On either side of the RAM will be some handles. Push these down and the RAM card should pop right out. Be careful to not use too much force.
Remember:
  • No water or food anywhere near where you are working
  • Never use force if something is not going right

Re-Attaching the New Motherboard

Once you have successfully taken out your old motherboard, you can now proceed to install the new one. The steps taken here are basically the same as detaching the motherboard, but in the opposite way.
  1. First, put the CPU onto the motherboard and close the metal latch.
  2. Open the handles on the RAM slots and push the RAM into it. There are corresponding holes on the RAM cards so make sure these are aligned.
  3. You should here a click with the RAM is attached properly.
  4. Take the motherboard and place it in the computer.
  5. Depending on the two types of motherboard you have, you may need to realign the 'legs' that the motherboard is screwed onto. In this case, take out the legs and screw them back in the corresponding shape to the larger holes on the motherboard.
  6. After doing this, screw in the motherboard.
  7. Plug the power supply into the motherboard.
  8. As before, you now need to replace the heat sink and fan on the motherboard. Place them onto the CPU and latch it in.
  9. Remember to plug the wire leading out of the fan into the motherboard for power.
  10. You now need to install your graphics card.
  11. Sliding in the end of the graphics card that has the hook first, slowly lower the other end until it fits nicely onto the motherboard. You may need to lift or switch a handle to secure it in place.
  12. You now have to reattach all the wires you took out.
  13. Start with the larger ones. Since you should not have removed the read/write drive and hard drive when taking out your motherboard, they should still be in place. Plug these into the respective slots.
  14. Now plug the rest of the wires in.
Remember:
In doubt, always refer to the motherboard manual.Testing the new Motherboard
After installing your new motherboard, you are ready to test it out. Reconnect all the wires you had into their respective slots on the back panel.
Turn the computer on. If you hear a beep, that is the sound of the motherboard detecting the hard drive. This is perfectly normal.
Changing your motherboard should not result in any major changes to the software on your computer. Make sure that everything still runs smoothly

Related Articles

How to install laptop RAM modules.

Difficulty: Relatively simple
Time Required: 10-15 minutes
Tools Required: Precision Philips or flat-head screwdriver

This guide was developed to instruct readers on the proper procedures for installing memory modules into a laptop computer. It includes step-by-step instructions for the physical installation of a memory module into those laptop systems that have an access panel to the memory modules. Not all laptops have this type of access. If yours does not, then it will probably require installation from an authorized technician.

For additional information about installing computer memory into your computer system, it is recommended that you read any user manuals that came with your computer for specific procedures that may be required. For more information for purchasing memory upgrades for a computer, please refer to the Before You Buy Memory upgrades article.

  1. Turn off the computer and remove all power cords from the computer system.
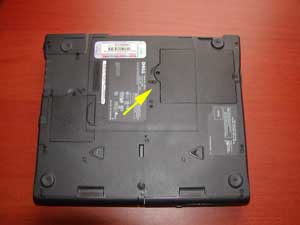
  2. Locate the panel used for access to the memory modules. This is generally located on the bottom of the laptop computer. Refer to your laptop instruction manuals for locating the panel.

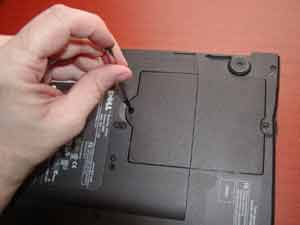
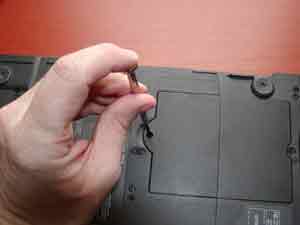
  3. Remove any screws that the panel in place and place somewhere safe to prevent losing it.
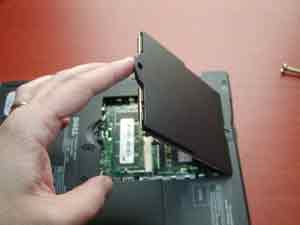
  4. Remove the panel from the laptop and set aside.
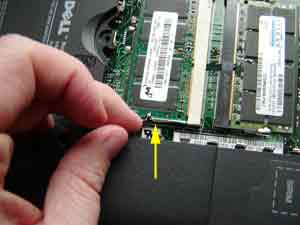
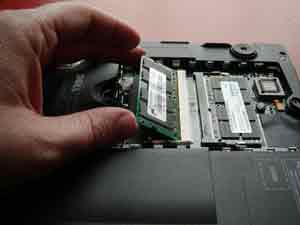
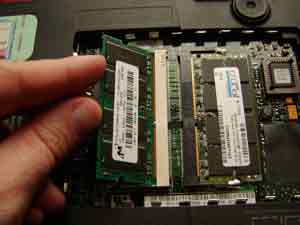
  5. If replacing or upgrading an existing memory module, remove the memory modules by undoing and module clamps and gently lifting the edge of the module to a 45-degree angle and then pulling the module out of the slot.

  6. Align the notch of the memory module with that of the memory slot and gently insert the module into the slot at a 45-degree angle.
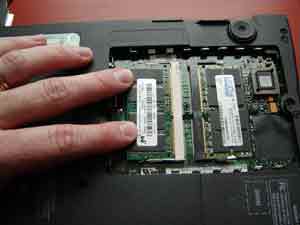
  7. Once all the pins are in the slot, gently rotate the module down flat until the clamps lock into the module into place.
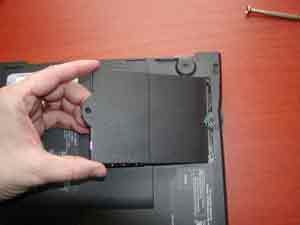
  8. Replace the memory access panel onto the laptop computer.
  9. Replace any screws or fasteners that hold the panel in place.

  10. Replace the power cord and power up your computer system.

Once the memory has been installed into the computer, the physical process is complete. When the computer is powered back up, it may be necessary to go into the computer BIOS to let the system properly detect the new RAM that has been installed in the computer. Please refer to the user manual for the computer system for any additional information.

How To Clean Your Laptop's Touchpad

Well, I suppose that everybody knows that laptops don’t come with that regular desktop computer mouse. Instead, laptops have pointing devices such as touchpads, pointing sticks or trackballs.

We will be speaking today about this laptops that have a touchpad as their pointing device and most of all, we will be speaking about how to clean the laptops’ touchpad. Cleaning your laptop touchpads improves the quality of the motion and response of the touchpad.

Because touchpads are sealed, you will not need to worry about dirt or dust entering your laptop. Instead yourself as a constant user will probably make your touchpad dirty. Yes, even if you may not be aware and as clean as you may be, your fingers are actually greasy. This grease, while working with your laptops’ touchpad gets on it making it more difficult to use after a period of time.

So, once in a while you have to clean the laptop touchpad. This can be easily done with a damp cloth with a bit of 50% solution of isopropyl alcohol.Or use a small amount of ammonia-based window cleaner. Actually almost any glass cleaning solution will do the trick. However,because of the “almost” word, if you don’t know for sure that you can safely clean your laptop touchpad with the solution you have, try it first on the bottom of your laptop bag to see if the solution doesn’t do some harm to the inside of the bag.

Always remember not to push too hard when cleaning the surface of the touchpad since the laptop’s touchpad is a fragile device that may suffer injuries while cleaning it. So carefully wipe the dirt off the touchpad of your laptop without pushing.

After cleaning it, if the touchpad was seriously wet, and the touchpad does not responde in the normal, expected way, a week or so of non-use may cure keys that don't work.


If by bad luck your touchpad gets damaged, you can speak with a laptop repairing service provider to change it as part of a new keyboard. It is an easy task to do in most of the cases. This is straightforward if the part can be obtained, usually direct from the manufacturer. Unfortunately, it is an expensive part (typically between $20 and $50)

However, be careful not to get to that point when you break your laptop’s touchpad while cleaning it because it will be more difficult to change or repair it than to pay a bit of attention when cleaning it...

How to Edit PDF Files without Adobe Acrobat

How to Edit PDF Files without Adobe Acrobat

PDF EditingThe PDF file format was originally created by Adobe in the early ’90s and there are now over 450+ million PDF documents on the Internet according to Google. Compare this with the DOC format that was created in early ’80s (much before PDF) but there are only 75 million .doc files on the web today.

Why PDF Files are Popular:

There are several reasons why PDF files are so popular for exchanging all sorts of documents including presentation portfolios, CAD Drawings, invoices and even legal forms.

#1. PDF files are generally more compact (smaller in size) than the source document and they easily preserve the original formatting. You can open a PDF file, that was created using a Windows PC, on a Mac or a Linux machine and your document will still look the same everywhere.

#2. Unlike Word and other popular document formats, the contents of a PDF file cannot be modified easily. You can also prevent other users from printing a physical copy of your PDF document.

#3. And the biggest advantage -- you can view PDF files on almost any computer (or mobile phone) using the web browser or with the help of free software like Adobe Acrobat Reader.

Edit PDF Files with Free Alternatives to Adobe Acrobat

While PDF Files are “read only” by default, there are ways by which you can edit certain elements* of a PDF document for free without requiring the source files or any of the commercial PDF editing tools.

[*] This article will primarily focus on tools that let you alter the actual contents of a PDF file. If you are looking to manipulate the PDF file structure itself like rearranging pages or merging multiple PDFs into one, please refer to the previous Adobe PDF Guide.

1. Online PDF Editor for Basic Tasks

There are situations when you need to make only minor changes in a PDF file. For instance, you want to hide your personal phone number from a PDF file before posting it on the web or want to annotate a page with sticky notes.

online pdf editor

You can perform such edits pretty easily with PDF Escape, an online PDF editor that’s free and also lets you edit password-protected PDF documents in the browser.

With PDF Escape, you can hide* parts of a PDF file using the whiteout tool or add annotations with the help of custom shapes, arrows, text boxes and sticky notes. You can add hyperlinks to other PDF pages / web documents.

[*] Hiding is different from redaction because here we aren’t changing the associated metadata of a PDF file but just hiding certain parts of a PDF file by pasting an opaque rectangle over that region so that that stuff beneath the rectangle stays invisible.

2. Edit PDF Metadata (Author, PDF Title, etc.)

If you like to edit the meta-data associated* with a PDF document, check out Becy PDFMetaEdit. It’s a free utility that can help you edit details like the PDF document title, author name, creation data, keywords, etc. of any PDF file.

The tool can also be used for encrypting PDF documents such that only users who know the password can read the contents of your PDF files. And since this PDF metadata cum bookmarks editor can be executed from the command line, you can use it to update information in multiple PDF files in a batch.

edit pdf metadata

[*] If you planning to post your PDF files on the web, you should consider adding proper metadata to all the files as that will help improve the organic rankings of your PDF files in Google search results.

3. Edit Text in a PDF File

convert pdf to wordIf you want to edit large amounts of text in a PDF file but don’t have access to the source documents, your best bet is that you convert the PDF file into an editable Word document or an Excel spreadsheet depending on the contents of the PDF.

Then edit these converted PDFs in Microsoft Office (or Google Docs) and export the modified files back into PDF format.

If your PDF document is mostly text, you may use the desktop version of Stanza to convert that PDF into a Word document but if the document includes images, charts, tables and other complex formatting, try the online PDF to Word converter from BCL Research or the one from NitroPDF -- the former offers instant conversion while the latter service can take up to a day though its yields more accurate results.

4. Advanced PDF Editing (Images, text, etc.)

Now that you know the basic tools, let’s look at another set of PDF editors that are again free but can help you do some more advanced editing with PDF documents. This refers to stuff like replacing images on a PDF file, adding signatures, removing blocks of text without breaking the flow of the document, etc.

pdf stamps

PDF XChange is a free PDF viewer cum editor that you may use for typing text directly on any PDF page. PDF XChange also supports image stamps so you may use the tool for signing a PDF file or for inserting images anywhere on a PDF page.

Then you have Inkscape, a free vector drawing tool (like Adobe Illustrator) that can natively import and export PDF content.

Edit PDF Files with Inkscape

With Inkscape, you can select any object on a PDF page (including text, graphics, tables, etc.) and move them to a different location or even remove them permanently from the PDF file. You can also annotate PDF files with Inkscape or draw freehand on a page using the built-in pencil tool.

The next tool in the category of advanced PDF editors is OpenOffice Draw with the PDFImport extension. OpenOffice Draw supports inline editing so you can easily fix typos in a PDF document or make formatting related changes like replacing color, increasing or decreasing the text size, replacing the default font-family, etc.

Like Inkscape, the OpenOffice toolbox also includes support for annotations, shapes, images, tables, charts, etc. but here you have more choices and the software also looks less complex.
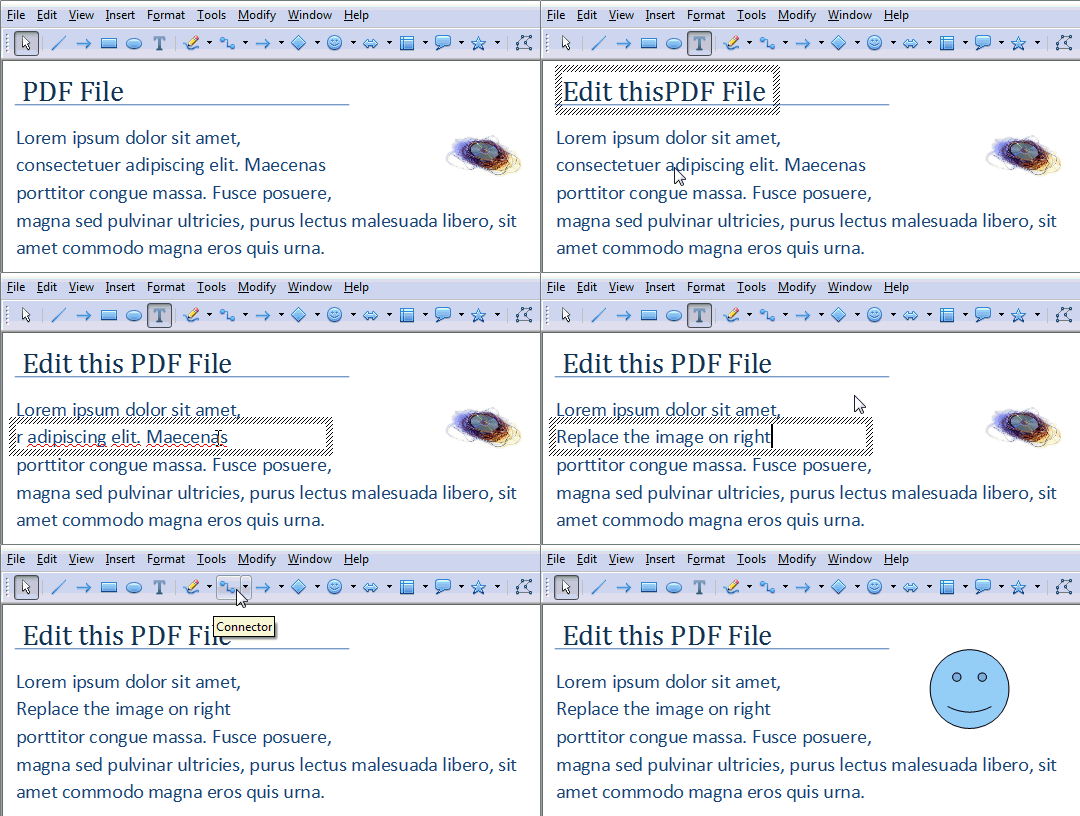
Edit PDF Files

The OpenOffice suite is a little bulky (they don’t provide a standalone installer for Draw) but if you have the bandwidth, OpenOffice is the best tool for manipulating PDF documents when you don’t have the budget for Adobe Acrobat.