December 24, 2009

New Cool Way of Resize Windows with FreeSnap


Sometimes manually resizing windows is a difficult task and also aligning them to the screen. With FreeSnap, you can move and resize windows with your keypad. You can just run this program, and you can use hotkeys to center windows or send them to all corners of the screen. FreeSnap allows you to instantly resize any window edge to the corresponding screen edge.
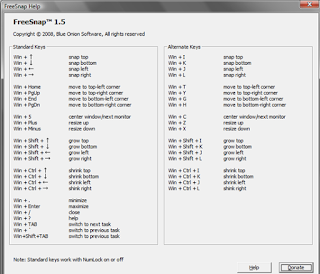
The Home, End, Page Up, and Page Down keys move a window to the corresponding corner of the screen without resizing the window. The “Plus” and “Minus” keys on the number-pad will resizing the window to a specific dimension. The dimensions used are 640 x 480, 800 x 600, 1024 x 768, 1152 x 864, 1280 x 1024.


FreeSnap also supports multiple monitors and when multiple monitors are detected, FreeSnap remaps the “5″ key to move the window from one monitor to the next. You can grow and shrink an edge by 10 pixels by pressing Windows Key + Ctrl + (an arrow key) or Windows Key + Shift + (an arrow key). You can also grow and shrink an edge by 10 pixels by pressing Windows Key + Ctrl + (an arrow key) or Windows Key + Shift + (an arrow key).


FreeSnap does no run in the system tray but once it is started from the start menu, it can resize the window.


How to Check for Dead Pixels on LCD Monitors


If you have an LCD monitor for your PC, then sometimes some pixels on the LCD might not work properly. A defective (hot, dead or stuck) pixel is a pixel that does not illuminate properly or does not display the correct color output. It usually looks like an annoying black, white or colored spot on your screen. It is not easy to find dead pixels directly on your monitor. InjuredPixels is a freeware tool which llows you to easily check for dead or defective pixels on LCD monitors


It can be used to test new LCDs before purchasing or during the warranty period. InjuredPixels is very easy to use and can be run directly from the Internet without installation. When you execute the program, it actually fills the entire screen with a primary or custom color, allowing you to inspect the screen for pixels that do not match the selected color.It is User Friendly Software


InjuredPixels runs on Windows 7, Windows Vista and Windows XP with Microsoft .NET Framework 2.0 or above. The main executable program file of InjuredPixels natively runs on both 64-bit and 32-bit versions of Windows.


How to Deploy Windows 7 to Windows XP Mode


Windows 7 Virtual PC is a feature especially designed for Windows 7 to run multiple Windows operating systems in one like running XP mode inside Windows 7. With can run more than one guest operating systems at the same time inside the virtual machines or many productivity applications on a virtual Windows environment via RemoteApp.

Windows XP is the most versatile, compatible operating system. When you upgrade to Windows 7, 99% of applications will run smoothly but according to Murphys Law, there is still 1% of kind which may not run. So, rather than any other Windows version, you will be interested in running XP inside so, Microsoft has released Windows XP Mode which runs some older productivity applications that may not run otherwise on Windows 7.

 
XP mode is a virtual machine package for Windows Virtual PC containing a pre-installed, licensed copy of Windows XP SP3 as its guest operating system. Both Windows Virtual PC and Windows XP Mode is available for download from official Windows Virtual PC homepage at 
http://www.microsoft.com/windows/virtual-pc/download.aspx 
 which you can refer for downloading XP mode in your local language. Here are direct links to download them in English:

Download Windows Virtual PC from below Link

Download Windows XP Mode  (Via Microsoft Official Site)

If you are concerned about application compatibility or your business depends upon some tools that only supports Windows XP.

4+Ways To Read PDF files Online without Installing Acrobat Reader

There are lot many ways to read Adobe PDFs online. Below are 5 ways to Read PDF files online,

Google Docs is an awesome online documentation platform from Google. You can use upload option on Google Docs to upload the PDF document and then view that document over there.


 You can use Gmail to read PDF documents. Email the PDF document from your own Gmail ID to your ID only and then open that mail. Click on ‘View’ button to read the PDF document using Google Docs.

Zoho – another online documentation platform where you can use Zoho Viewer to view different type of documents including Word, Excel, PDF etc. Use this free platform to view your PDF document without installing Acrobat Reader


 3. PDFMENOT

Use this web application to view your PDF document. Upload the document from your computer and then you can see that in action.


Another free web application to view PDF documents online. Read PDF documents on this web application online without installing any software on your local computer.


This is also an online application where you can read PDF documents. You can use the unregistered version of PDFescape to use it without any registration.


How To Take Screenshots from Microsoft Office 2010 Word, Excel, PowerPoint inbuilt Tool


Microsoft Office 2010 Beta has been released and you can download and try the Professional Plus beta version. Office 2010 is having lot many new features including inbuilt “Screen-shots” feature thru which you can take screenshot of any window on your computer and attach that into the document without installing any other software. You can also save that screenshot on your local machine for future usage.
Screenshot Tool is an easy to use option on Microsoft Office 2010 to take screenshots and here is the step by step guide on how to use that feature.
Steps to Take Screenshots

We are taking Microsoft Office Word 2010 in this example:

1. Open a document or blank document on Microsoft Office Word 2010
2. Go to ‘Insert’ tab and click on ‘Screenshot’ option available besides the Chart option (10’th position from left on menu bar)
3. It will show you the active windows on your computer. If you want to take a full snap of those active windows, then select the windows from the list
4. To take a screenshot of selective area only, Click on ‘Screen Clipping’ option at the bottom
5. Recent window on your computer will become active (faded window) and you can select the area to take screenshot
6. Screenshot will be copied to your Microsoft Office Word document
7. You can change the format and design of that screenshot image from the ‘Format’ Picture Tool on Menu bar
8. Save the screenshot on your local computer by right click on image ===> select ‘Save as Picture’ from menu
You can use Screenshot feature on other applications like PowerPoint and Excel on Office 2010. Here is the location of Screenshot Tool in these applications.


                                                        Screenshot Tool in PowerPoint


                                                         Screenshot Tool in Excel

 If you know any other interesting feature you can leave list of those features in comment box