December 31, 2009

HAPPY NEW YEAR-2010

Happy New Year, Dearest Reader!

You probably have no idea how much I appreciate you.
This blog has been an exciting journey since I started it just a few months ago, and it promises to get more exciting yet. 


I thank you for being part of it. For reading my sometimes quirky and definitely quite meandering musings, resources, and recommendations, and for signing up for my newsletter.

How to Copy scratched CD/DVD Using Copy Cat

There is common problem after certain period, CD or DVD are highly prone to scratches if we do not care them. There is very hard to get data back from CD or DVD. Yesterday, i have my backup CD of projects. This seems like impossible to get data.

The software named as Copy Cat 2.0.,it is freeware app actually skip the bytes which are not readable from file and copy all other bytes therefore it extracts max data which is normally not done by windows copy operation. Copy Cat can be helpful at times when you want to copy a CD or DVD which is scratched,when you want to copy data from harddisk area which is partially not readable.

 
Another an excellent feature about copy cat. It's also worked with floppy although it is not commonly used . But peoples usually have backup in Floppy Disc. So, it's also works with the same method of skip the unreadable byte on it.
Features of CopyCat


  • It even tries to copy a highly damaged media byte by byte
  • It gives you the option to skip the bytes if bad area found
  • It is a very fast data recovery tool
  • It also tries to copy damaged files on your hard disk
  • Unlike Windows copy operation it does not stop the copy if bad area found


Download Copy Cat


How to Transfer Files Very Quickly-TeraCopy

How to Create a font from your own handwriting

Everyone can create a font from there own handwriting. There's no software to download and install, all you need is a printer and a scanner. Simply fill in the font template, scan and upload it to our website, and download your completed font. The fonts you create using fontcapture.com can be used on both Windows and Mac computers.
Steps to Create a font from your own handwriting
Requirement
  • Printer
  • Scanner
1) Download Font Template it is in PDF format, so you'll need a PDF reader like Acrobat Reader or Foxit Reader to open it.
2)Print the Font Template Page.
3) Fill the Font template Boxes with respective Alphabet:
After printing the font template, it's time to fill it in with your own handwriting. For best results it's recommended to use a black marker pen (Sharpie or similar). Make sure to leave a margin around each character.

Jaws PDF Creator 4.0 For Mac-gDoc


Jaws PDF Creator provides an affordable and reliable means of creating PDF files from virtually any document in any application. Using Jaws PDF Creator, businesses are able to easily create electronic documents that can be shared across a wide range of hardware and software.


Jaws PDF Creator can be used in several modes. It is seen as a printer in the Windows or Macintosh Printing System allowing users to 'print' to a PDF file directly from any application and it also appears as an icon on the desktop allowing drag-and-drop conversion of any PostScript� or EPS file directly to PDF. For Windows users, a toolbar icon installs in Microsoft Word and PowerPoint, allowing any business user to easily create PDF files. The toolbar icons can also be used to retain document structures such as bookmarks and hyperlinks from the original document.

Download for Mac OS

Jaws PDF Creator offers full control over PDF configuration settings and allows users to pre-define PDF configuration settings which can be selected at the point of PDF generation.

Download for Windows

[via]

How to check BSNL BroadBand Usage

If you’re using BSNL Broadband services here in India, you might be wondering how you can check your BSNL Broadband Usage. It’s quite easy, but a lot of people seem to be not knowing where they should go to check their BSNL Broadband Usage. Here are a few methods to monitor your bandwidth usage:

Steps check your broadband
Requirement
Portal id :draXXXXXXXX (Your portal ID provided by BSNL)
Password :**************(Your password provided by BSNL)
Then visit this site http://www.data.bsnl.in


Enter your username(portal id) and password Hit Enter to login Then click on my prepaid connections ,select the Service name as Broadband,Account Number and select the month.


It will display the complete details of your broadband usage and also you can export these usage page to Excel for your future use.

If you have any problem regarding this issue leave a Comment here

December 30, 2009

How to Remove System Shutdown Error


Some users whose computers have been infected may not notice the presence of the worm at all, while others who are not infected may experience problems because the worm is attempting to attack their computer. Typical symptoms may include Windows XP and Windows Server 2003 systems rebooting every few minutes without user input, or Windows NT 4.0 and Windows 2000 systems becoming unresponsive.

Shutdown error: - If your computer is infected, you may see this error message.


Steps to Remove the System Shutdown Error

1.Download the Blaster Nachi Removal tool from the King's Sophos Anit-Virus Site. Follow the instructions on the site on how to download the Resolve Tool 

2.Download the Appropriate Patch for your Computer. Select the Patch that was designed for  your system. If you are not sure what version of windows you are running, click here.


RPC/DCOM Patches KB824146
Version

Download Link
Windows 2000
Click Here
Windows Xp
Click Here
Windows NT 4.0(Work Station)

Click Here
Windows NT 4.0(Server)
Click Here


3.Disconnect your Computer from the internet or Network 

4. Run the disinfection Tool to remove any Blaster Infections 


5. After the diinfection tool completes, run the Patch. 


6.After the patch installs your computer will need to be rebooted. Reattach your computer   to the network.
 

At this point your computer should be clean and protected from further exploits of the RPC vulnerability. 

Now Another Bittorent Client-New Cool BitSpirit


If you like to use BitTorrent client, now you can use BitSpirit which is easily to use. It full with BitTorrent protocol implementation and also many personalize features like simultan download, download queue, UPNP port-maping, NAT traversal(UDP transport), select downloads from multiple files torrent package, disk cache, chatting with other peers, torrent market,ip-filter, etc. In 3.0 or above versions of BitSpirit, it also supports DHT network - which is based on Kademlia protocol, and fully compatible with Bittorrent official client.


BitSpirit  Features:
* Clean interface
* Multiple simultaneous downloads
* Disk cache mechanism
* Fast job resume
* File selecting support
* Powerful file manager
* UPnP port-mapping
* Instant Messaging support
* Gzip Data compression
* Speed control
* Scheduled downloading
* Torrent Market


How to Remove Or Block Ads In Yahoo Mail?

If you use Yahoo Mail, you probably get annoyed by the ads on the right of the Yahoo Mail page. They are quite obtrusive and are really distracting. Don’t worry though. You can easily remove or block these Yahoo Mail ads. Here are three methods to hide Yahoo Mail ads:

1. Use the Hide Button to Remove Yahoo ads
Yahoo itself provides a way to hide ads in Yahoo Mail. There’s a small arrow mark near the long vertical banner ad. When clicked, the advertisement gets hidden immediately.The downside is that the ad will reappear the next time you open a new mail. So, this is not a permanent solution to block ads in Yahoo Mail.

2. Install Firefox + Greasemonkey Script to Block Yahoo ads: There’s another way to block Yahoo ads and here’s how you can go about doing it. Download and install Firefox, and then install the Greasemonkey addon. Then go here and install the Yahoo! Mail Cleaner script. This script will allow you to remove ads in Yahoo Mail.Refresh the Yahoo mail page and voila! The ads are gone.

3. Upgrade to Yahoo! Mail Plus to Remove Yahoo Ads: This is the 3rd method to remove Yahoo Mail ads. You’ll have to shell out $19.99 from your pocket and the graphical Yahoo Mail ads are gone permanently. You get loads of other features, you can check more on this here.Hope these methods to disable and remove Yahoo ads in the Yahoo Mail page worked for you. Let us know in the comments section if you experience any difficulties in blocking Yahoo Mail advertisements.

[via]

How to Turn off Ads in Gmail Account

You may find Google sponsored links everywhere on web. Gmail also displays sponsored links and web clips at top in email accounts. If you are annoyed with these targeted ads popping every now and then in your Gmail account, you can turn them off. Here is a little tip that will help you do this.

Steps To turn off these Gmail ads

Open your Gmail account.
  • Click on “Settings” at top right corner.
  • Select “Web Clips” tab.
  • Uncheck the “Show my web clips above the Inbox” check box there. That’s it. You’ll not show any ads from now on.

This little trick turns off ads displayed at top of the mailbox. However, you will also find ads at the right side of your mail content. Thanks David for pointing this out. This another tip targets those ads. For this trick to work, all you need is a MozillaFirefox browser and a GreaseMonkey script. Follow these simple steps to remove those annoying ads.

  • Start Mozilla Firefox and install GreaseMonkey add-on from here if you haven’t already.
  • Now, install “Gmail Without Ads” GreaseMonkey script from here.
  • Just activate that script and you are all set to go.
  • Login to your Gmail account and enjoy the neat look of your mailbox.


Before Removing the Ads
After Removal of Ads
You can always restore these settings when you like to display these ads again. But hey, who wants them anyway?
[via]

New Bluetooth 3.0 Released with speed improvement

This new release is faster, safer and backward compatible. With this announcement from Bluetooth SIG, consumer electronics and device manufacturers can now build their application according to Bluetooth 3.0 specification. Here is a synopsis of features this new version is going to provide, taken from SIG press release.

Special Cool Features of Bluetooth 3.0

1.Bluetooth 3.0 gets its speed from the 802.11 radio protocol. The inclusion of the 802.11 Protocol Adaptation Layer (PAL) provides increased throughput of data transfers at the approximate rate of 24 Mbps. In addition, mobile devices including Bluetooth 3.0 will realize increased power savings due to enhanced power control built in.
2.This newest version of Bluetooth technology builds on the inherent qualities of the current 2.1 EDR version, including Simple Secure Pairing and built-in, automatic security. And as with all versions of the Bluetooth specification, Bluetooth 3.0 HS provides developers, manufacturers and consumers with the benefit of backwards compatibility, enabling both the expansion and enhancement of this technology with every new specification release.

3.Looks like this new version is primarily aimed at speed improvements, as their application area includes bulk transfer of videos, music and photos between user’s devices and the trusted devices of others, without the need for cables and wires. And what about those devices for general availability? It is expected to see consumer products in the market in 9 to 12 months.

December 29, 2009

5 Excellent Online HTML Tutorials


1.W3School

W3Schools, you can study everything you need to learn, in an accessible and handy format.It is very famous for HTML Online tutorials


2.HTML DOG
If you have looked at tutorials, you might have found that they mention certain things that HTML Dog does not. This is because many methods are obsolete, non-standard or just plain bad practice. Getting into the frame of mind of doing things the right way from the start will turn in to much better results in the end.


3.HTML.NET

This site also provides a good HTML Tutorial will give you an easy, yet thorough and correct introduction on how to make websites. The tutorial starts from scratch and requires absolutely no prior knowledge of programming.


4.Quackit
This Another HTML Tutorial is for beginners. It teaches you HTML from the ground up - starting with the basics. Coding HTML is actually quite easy - as this tutorial will show you.


5.HTML Code
HTMl code goal is to provide the most helpful and complete guide to creating web pages anywhere

How to Disable Program Compatibility Assistant in Windows 7


window 7 user and you must have notice the notification of Compatibility Assistant popping up constantly can be annoying. It really created the problem while doing the work fast. If you have administrator rights on computer , you can disable this annoying popup.

The error like this ....


Steps of Disable program Compatibility Assistant in Window 7 along Window Vista

1. Click Start button and type in Search Box "services.msc" like in the image


2. Window appeared and see the list and scroll down to "Program Compatibility Assistant Service" and click Stop


3. You will see the Service control screen that show the process bar.

I will not recommend home users to disable this option, Might be, they will get troubled for doing these steps. Questions and suggestions are welcome

How to Automatically Delete a Logo From An Image-Inpaint


If you have a photo and want to remove an
object or scratched area from the photo, this is the finest solution for you. InPaint a smart tool released by Teorex hold a lot of features for you. The tool lets you effortlessly remove an object from the background. It is suitable for scratches, noise and all kinds of objects that are not belonging to the photo or spoil the composition. It is clearly given in the image below.


Moreover, the tool is able to reconstruct the selected image area from the pixel near the area boundary. Inpaint may be used to remove undesirable objects from still images.

At the same time, you can delete any unwanted object from your photo, such as logo, watermark, extra power-line, people, and text. The program is able to automatically inpaint the selected area to erase it. Therefore, it saves you energy and time from doing any unwanted work like using clone tool.

[via]

How to View Microsoft Project Files Online-Trusted Viewer

There are several free viewers available for Word, Excel and PowerPoint,but Microsoft does not provide an official viewer for Microsoft Project (.mpp) files. That means if you don’t have the Project program installed on your computer, you can’t read any of those project plans lying in your mailbox.

There’s however an trusted option now that will let you view and print Project files in the browser itself without requiring MS Project. It’s called projec.to.

How to Open Microsoft Project Files Online

To open a project file without installing Microsoft Project, just sign-up for a free plan at projec.to and upload your .mpp (or .mpt template) file.
The service will then render your project plan in a browser based Flash-viewer from where you can view the plan and also print it or even
embed it in external web pages using Flash.

The service offers both free and paid plans but if you opt for the free option, any MS Project file (or Template) that you upload onto projec.to will be public by default.

You can also delete files immediate after viewing them online but if your projects plans contain something extremely confidential, it may be a good idea to go with one of the paid plans that start at $5/month and allow private viewing.

[via]

How to Get Alerts When Your Websites Are Down – Pingdom

Do you have a website or blog? Try Pingdom Today..Here is 100% Discount Coupons for Pingdom.

Pingdom is Very Popular service that will monitor your websites from different locations in the world and the service will follow up your site status continuously and instantly send you an alert if one of your site goes down or becomes inaccessible from any of these monitoring locations.

Get Alerts via Email, SMS,
Twitter..
In addition to the regular email and SMS text based alerts, Pingdom can also send you tweets to inform the downtime of your website instantly.

They have a free iPhone App (with push notifications) and a Windows notifier so you’ll come to know of your site’s downtime even if the mail client is not running on your desktop.

Pingdom Pro Accounts – Giveaway

I have been using the free version of Pingdom for more than a 6month now, along with a couple of other website monitoring tools, and it has almost always been accurate in reporting the downtime (as well as uptime) of my site.

Pingdom also offers a free account that lets you monitor one website and includes 20 SMS alerts. you have to upgrade to a Pro account and that costs around $10 per month.

We have some 20 discount codes that will get you one-year of Pingdom Pro at 100% discount. In case you would like to have one, fill this Google form and if you are lucky, you’ll get the code via email.


December 28, 2009

Mimo introducing Sweet Mini USB Monitor


Mimo Mini Monitors are handy to have additional monitor space at the ready. Problem is an entire secondary monitor comes with its own needs like requiring a separate power cord or perhaps an additional video card.


Attracting Features

1.The Mimo Mini USB Monitor offering a low-maintenance relationship between you and an extra display.

2.A single USB connection from your computer gets you an instant high-resolution secondary display. This awesome display is perfect for your IM client, widgets, PC gaming tools, your email, a spreadsheet, your PhotoShop tools, or even video!

3.These displays enhance productivity, they look great! The single USB connection, combined with a weight of only 1.3 pounds, means the Mimo monitor is ultra portable and cost-effective, as no expensive extra video cards are required.

[via]

December 26, 2009

Quick Steps to set filter for emails in your gmail account


It is a gmail tips to set filter for emails in your gamil account. This post is really for newbies who are not much familiar with gmail account settings. This filter can help you to categorize mails in your account by assigning different Labels for them. The steps to filter emails from a particular sender is:

1. Log on to your gmail account
2. Click on Settings

Settings tab is ion the right hand top of the page.
3. Click on Filters

4. Click on Create a new filter

Now the filter options window will appear.


Now you will get different options to set filters in your gamil account. The possible options are

a. Filter based on from address

b.. Filter based on To address

c. We can filter a particular subject

d. We can filter mails containing certain keywords

e. We can set filter by black listing certain keywords (opposite to iv )

5. Enter the criteria to set filter and click next

Now the wizard will ask you what will be the end action of the particular filter.


Now your gmail account is ready for filter


4 Steps to Start Wireless Zero Configuration (WZC)

The major reason for not detecting wireless networks on a wireless computer is the wireless service WZC (Wireless Zero Configuration) is not started. After starting the Wireless Zero Configuration most of the wireless related issues will be resolved.


How to Enable Wireless Zero Configuration
 1. Click on start 
2. Click on Run
3. On Run window type services.msc hit Enter


Now the services windows will be opened. The WZC (Wireless Zero Configuration) is third service from last.
4. Open the service and click on start button to enable the WZC service.
 

I think it helps to resolve your Zero configuration issue 


5 steps to Keep Laptop bettery charge for a long period


you should be careful while using laptop and want to know how to utilize the Laptop battery charge in a better and efficient way. So the important points you need to remember to retain the Laptop battery charge for long are:


1. Turn off Wireless and Blue-tooth 
 If the Wi-Fi button is on ,it will take additional power to scan available wireless networks present in that area. If it fails to find any wireless network it will not stop the process and continually scan for the wireless networks. This process will reduce the battery charge. The story is same for Blue-tooth too. So it is better turn off the wireless button on your laptop.  

2. Avoid playing computer games
It is better avoid playing games on your Laptop to keep the battery charge for long. Playing games on your Laptop drain laptop batteries.  


3. Reduce the Laptop Speaker Volume and don't play any movies  

4. Reduce screen brightness


5. Avoid using external devices like external mouse, DVD drive,USB adapters etc  

6. Avoid using multimedia application on your Laptop
 

So the tips written above might be very silly for you but I am sure most of us won't care the simple things in their life.

Steps to Open System Volume Information Folder

System Volume Information Folder stores system restore points on your computer to help you in system restore. It is one of the noted position of virus creatures and some times difficult position for them. The reason is like the user don't have direct ownership of this folder. The user (Administrator) cannot take the ownership of the folder directly and open this folder. To do this we need to change some security settings. So the steps to get the ownership of the System Volume Folder and open it follow the steps below.

How Open System Volume Information Folder

To Open System Volume Information Folder in Windows XP follow:

1. Open My Computer and Click on Tools (On Top menu) 

2. Click on Folder Options 
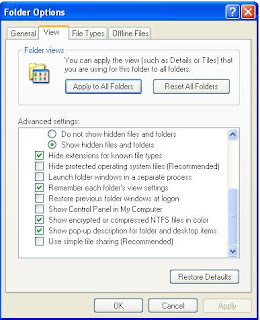
3. Click on View tab

Now perform the following sub actions:

a. Select Show hidden files and folders 

b. Uncheck the Hide protected operating system files (Recommended) check box. 
c. Uncheck Use simple file sharing (Recommended) check box
Click Yes when it need confirmation.Now Click on Save and OK.

  
Grant Access to System Volume Information

Normally System Volume Information folder it won't allow us to access it. We need to change the This folder is located in the drive where Windows is installed.

4. Right Click on System Volume Information Folder and Click on Properties


5. Click on Security tab

Then add the user account on which we need to access the System Volume Information Folder. Now click OK and it is ready to explore.


How to Remove CCA3\E3X3\acx3.exe Virus (Trojan.Win32.Agent)


What is CCA3\E3X3\acx3.exe Virus?

A malicious trojan horse or bot that may represent security risk for the compromised system and/or its network environment

Alias: 

Trojan.Win32.Agent.decy [Kaspersky Lab]
Trojan.Win32.Agent [Ikarus] 

Symptoms of Infection.  
1.The following directories were created:

c:\CCA3
c:\CCA3\E3X3

2.The following Registry Key was created:

HKEY_LOCAL_MACHINE\SOFTWARE\Microsoft\Active Setup\Installed Components\{67KLN5J0-4OPM-61WE-KKX5-457QWE23218}  

The newly created Registry Value is:  
[HKEY_LOCAL_MACHINE\SOFTWARE\Microsoft\Active Setup\Installed Components\{67KLN5J0-4OPM-61WE-KKX5-457QWE23218}] StubPath = "c:\CCA3\E3X3\acx3.exe"
so that acx3.exe runs every time Windows starts

3.It modifies the Personalised Settings


4.Creates msupdate.exe and update.exe in C:\Documents and Settings\user directory


5. Some time it creates update.exe in C Drive.


6.Creates a Pseudo Dial up connections in Network Connections with the name a-connect,z-connect and it disconnects original dialup connection repeatedly.


Steps to Remove CCA3\E3X3\acx3.exe Virus   
1.Press Alt+Ctrl+Del.....Task Manager opens go to Process End Explorer.exe by Clicking end Process button


2.Go to File Click on Run


3.Type cmd in Run Box....Press Enter Command Prompt Window opens


4.Then Type the Following Command if you find Difficulty refer figure below
 

C:\Documents and Settings\user> Type cd\ Press Enter
C:\> Type attrib -h -r -s CCA3 Press Enter
C:\ CCA3>Type CD E3X3 Press Enter
C:\CCA3\E3X3\> type dir to acess E3X3 Directory
C:\CCA3\E3X3\> type del acx3.exe
C:\>Type Del CCA3 (Repeate only this command three times until Virus gone) 

Ask for delete Confirmation Press Y 
C:\>Type Del CCA3
Ask for delete Confirmation Press Y
C:\>Type Del CCA3 

If you got message Could not Find C:\CCA3.exe ,Operation is Success Virus Should Be Gone!


5.Now it is the time for deleting other dangerous created by Virus


a)Delete CCA3 Folder you can observe in C drive.If you able to find msupdate.exe in C drive you can delete that file also.

b)Delete msupdate.exe and update.exe from user C:\Documents and Settings\User

c)Delete Dialup connections Like a-connect,z-connect from Network Connection

d)Then delete the registry created by Virus.If you find difficulty you can use registry cleaners like Glary Utilities, or CCleaners etc.


Now your Computer is Happy......
If you think i am helped to solve your issue.Leave a Comment below

December 24, 2009

New Cool Way of Resize Windows with FreeSnap


Sometimes manually resizing windows is a difficult task and also aligning them to the screen. With FreeSnap, you can move and resize windows with your keypad. You can just run this program, and you can use hotkeys to center windows or send them to all corners of the screen. FreeSnap allows you to instantly resize any window edge to the corresponding screen edge.

The Home, End, Page Up, and Page Down keys move a window to the corresponding corner of the screen without resizing the window. The “Plus” and “Minus” keys on the number-pad will resizing the window to a specific dimension. The dimensions used are 640 x 480, 800 x 600, 1024 x 768, 1152 x 864, 1280 x 1024.


FreeSnap also supports multiple monitors and when multiple monitors are detected, FreeSnap remaps the “5″ key to move the window from one monitor to the next. You can grow and shrink an edge by 10 pixels by pressing Windows Key + Ctrl + (an arrow key) or Windows Key + Shift + (an arrow key). You can also grow and shrink an edge by 10 pixels by pressing Windows Key + Ctrl + (an arrow key) or Windows Key + Shift + (an arrow key).


FreeSnap does no run in the system tray but once it is started from the start menu, it can resize the window.


How to Check for Dead Pixels on LCD Monitors


If you have an LCD monitor for your PC, then sometimes some pixels on the LCD might not work properly. A defective (hot, dead or stuck) pixel is a pixel that does not illuminate properly or does not display the correct color output. It usually looks like an annoying black, white or colored spot on your screen. It is not easy to find dead pixels directly on your monitor. InjuredPixels is a freeware tool which llows you to easily check for dead or defective pixels on LCD monitors


It can be used to test new LCDs before purchasing or during the warranty period. InjuredPixels is very easy to use and can be run directly from the Internet without installation. When you execute the program, it actually fills the entire screen with a primary or custom color, allowing you to inspect the screen for pixels that do not match the selected color.It is User Friendly Software


InjuredPixels runs on Windows 7, Windows Vista and Windows XP with Microsoft .NET Framework 2.0 or above. The main executable program file of InjuredPixels natively runs on both 64-bit and 32-bit versions of Windows.