Showing posts with label XP tricks. Show all posts

January 19, 2010

Cool Trick To Change Thumbnail size of a picture in Windows

When we browse images in the explorer, the thumbnail size of the picture's is some time too small or too big and the quality of the thumbnail is not good, so it is possible to change the size of the thumbnail as usual as quality of thumbnail which is displayed in explorer.
The Trick is related to Registry Modification,so backup your registry before changing the registry value.


Step1. Go to - start->run-> regedit

Stept2.Navigate to  HKEY_CURRENT_USER\ Software\ Microsoft \ Windows\ CurrentVersion\Explorer

Step3. Create 2 new DWord Value ---> right click and select "new->DWORD value" and name one DWord value as "ThumbnailSize" and other Dword Value as "ThumbnailQuality"

Step4. In this step we have to change Decimal Value for both, ThumbnailSize  (values 32 - 256 )and Thumbnail Quaility (values 50 - 100)

Step5. Now you can open any folder and change the view to Thumbnail and see the difference.

December 26, 2009

Steps to Open System Volume Information Folder

System Volume Information Folder stores system restore points on your computer to help you in system restore. It is one of the noted position of virus creatures and some times difficult position for them. The reason is like the user don't have direct ownership of this folder. The user (Administrator) cannot take the ownership of the folder directly and open this folder. To do this we need to change some security settings. So the steps to get the ownership of the System Volume Folder and open it follow the steps below.

How Open System Volume Information Folder

To Open System Volume Information Folder in Windows XP follow:

1. Open My Computer and Click on Tools (On Top menu) 

2. Click on Folder Options 
3. Click on View tab

Now perform the following sub actions:

a. Select Show hidden files and folders 

b. Uncheck the Hide protected operating system files (Recommended) check box. 
c. Uncheck Use simple file sharing (Recommended) check box
Click Yes when it need confirmation.Now Click on Save and OK.

  
Grant Access to System Volume Information

Normally System Volume Information folder it won't allow us to access it. We need to change the This folder is located in the drive where Windows is installed.

4. Right Click on System Volume Information Folder and Click on Properties


5. Click on Security tab

Then add the user account on which we need to access the System Volume Information Folder. Now click OK and it is ready to explore.


December 14, 2009

Free Way to Use and Mount Images (ISO files) Without Burning Them:XP

Microsoft has an unsupported virtual CD-ROM program. Why buy alcohol or Daemon Tools?


Alcohol and Daemon Tools are excellent software packages that allow users to mount ISO files as virtual CD-ROMs. Yes, there is a way to use that ISO without burning it to a disk.

Although I love these tools, Microsoft has a free, 60kb program that does the same thing! Of course, it is not supported… and it’s not as friendly as the software listed above; however, it works and it’s free.

Here’s the download link:
winxpvirtualcdcontrolpanel

Here’s the readme:

    Readme for Virtual CD-ROM Control Panel v2.0.1.1

    THIS TOOL IS UNSUPPORTED BY MICROSOFT PRODUCT SUPPORT SERVICES

    System Requirements
    ===================
    - Windows XP Home or Windows XP Professional

    Installation instructions
    =========================
    1. Copy VCdRom.sys to your %systemroot%\system32\drivers folder.
    2. Execute VCdControlTool.exe
    3. Click “Driver control”
    4. If the “Install Driver” button is available, click it. Navigate to the %systemroot%\system32\drivers folder, select VCdRom.sys, and click Open.
    5. Click “Start”
    6. Click OK
    7. Click “Add Drive” to add a drive to the drive list. Ensure that the drive added is not a local drive. If it is, continue to click “Add Drive” until an unused drive letter is available.
    8. Select an unused drive letter from the drive list and click “Mount”.
    9. Navigate to the image file, select it, and click “OK”. UNC naming conventions should not be used, however mapped network drives should be OK.

    You may now use the drive letter as if it were a local CD-ROM device. When you are finished you may unmount, stop, and remove the driver from memory using the driver control.

December 10, 2009

How to Avoid the XP Product Activation After a Reinstall


Have you ever had to
reinstall Windows XP? If so, have you ever had to reactivate it? I recall hearing one of the guys at work talking about the problems he’d had during a reinstall. He had to jump through hoops in order to convince Microsoft to allow him to reactivate.

If you plan to reinstall WinXP on a machine that already has XP on it, you can back up the current activation keys and restore them after you reinstall. You won’t have to contactMicrosoft for a reactivation.

Before you Reinstall:

1. Make sure that you back up all of your personal files, data, programs, license keys and product keys.

2. Gather copies of the service packs and security software that you’ll need.

3. Go to the following folder: C:\Windows\System32

4. Find the files named wpa.dbl and wpa.bak, and copy them to a floppy disk or CD.

During and After You Reinstall:

I’ll recommend that you take your PC offline (no internet connection) during installation. This allows you to install the service packs and security software before you reconnect to the internet. An unprotected PC can get infected in less than a minute online.At the end of the installation, if you get a prompt to activate Windows, follow the steps below:

1. Just say no. Microsoft will allow you a grace period to activate.
2. Reboot the PC.
3. Hit the F8 key during boot to get the advanced boot screen.
3. Choose “Safe Mode”.
4. Once in Safe Mode, open up that same folder at C:\Windows\System32.
5. Locate the two wpa files wpa.dbl and wpa.bak. If you don’t find the bak file, don’t worry.
6. Rename the files to something else, like maybe wpadbl.xxx and wpa.xxx.
7. Now copy the two files, Wpa.dbl and Wpa.bak, from the floppy or CD, into the system32 folder.
8. Reboot as you would normally.

Now you don’t have to contact Microsoft and you haven’t broken any rules, as far as I know. You’re good to go.

Do You Have XP Activation Problems?

If you have problems with your activation, I found this forum thread that may help.

You can also find out more about XP activation at this Microsoft page.


December 9, 2009

Cool and Attracting UBUNTU theme for windows xp users


Cool ubuntu look for your windows XP.Download it from here.

How to use it??

* Download UX Theme MultiPatcher from here
* Install it in your PC.
* Extract the rar file. Double click on the .msstyle file and apply the style.
* Done.

All the softwares required are freeware.

December 1, 2009

How to Save Windows Update for Future Use-AutoPatcher

Saving the windows update files on a disk will help you install these files on a fresh installation of windows or to install these updates on a computer which is not directly connected to Internet. For this there are two Tools. Lets see the details of what these tools do and how they work.
The Tools are :

1. AutoPatcher

2. WUtool By MajorGeeks
AutoPatcher
AutoPatcher is a tool that will check what all updates you need and will download them for you. It will install the updated and will save them on disk for re-use if needed. To know more about this tool, see this page.
http://www.autopatcher.com/downloads/

WUtool By MajorGeeks WUtool is again a windows update tool developed by MajorGeeks. This tool will control the download and installation of windows update files and save Windows Updates files in a special folder. This is a lightweight tool which is very useful.

http://majorgeeks.com/WUtooL_d4332.html

How to Disable Error Reporting in Windows XP

Does Word keep crashing your computer
every other day and then have the nerve to ask you to send an error report to microsoft every single time, which doesn’t seem to help with your problem!? I personally find the Error Report dialog to be a pain and therefore have disabled it. Half the time, it’s not even a Microsoft product that is crashing, so what is microsoft going to be about it? It’s either poorly written software or some other issue like a messed up registry, etc.

Here’s how to turn off the error reporting popup box when a program crashes:

1. Right click on My Computer and go to Properties.


2. Next, on the System Properties dialog, click on the Advanced tab.


3. Click on the Error Reporting button at the bottom right. Choose the Disable error reporting option and make sure “But notify me when critical errors occur“.


This ensures that you’ll be notified if something serious happens, but otherwise the daily crash of IE or Word or whatever app is not going to be bothering you with a useless Send to Microsoft popup!


OEM Editor For Windows Vista And XP

Let's do some fun stuff today....See I have done it in my Computer...

TRICK 1

open notepad dump the following lines into it and save it with the name OEMINFO.INI in the c:\windows\system32 directory:
-------------------------------------------------------------------------------------
[General]
Manufacturer=Your Name Here
Model=Your Model Here
[Support Information]
Line1=Your Name Here
Line2=Your Address Here
Line3=Your Email Address Here

-------------------------------------------------------------------------------------

1. Save the file.

2. Then make a right click on my computer select properties, in the general tab a button will be highlighted (support information) make a click on it, you will be able to see the changes.

3. Now if you want to display some more information then simply increase the line in the file.

Ex: Line4=Your Working Hours Here


TRICK 2

Download And Install OEM Editor From below Link. Then Run the program,By using this software we can change OEM information Directly.


Prathap OEM Editor For Windows XP

Download


November 30, 2009

How to change Pendrive Background just like your Desktop


Just Like your desktop, you can change your pen drive background and also hard disk drives background. This tricks only works for Windows XP.
Just Copy the below code to notepad, then save it as "desktop.ini"


[.ShellClassInfo]
IconFile=%SystemRoot%\system32\SHELL32.dll
IconIndex=127
ConfirmFileOp=0
[{BE098140-A513-11D0-A3A4-00C04FD706EC}]
Attributes=1
IconArea_Image="example. jpg"
IconArea_Text="0xFFFFFF"
VeBRA sources - don't delete the tag above, it's there for XXXXX purposes -
[ExtShellFolderViews]
{BE098140-A513-11D0-A3A4-00C04FD706EC}={BE098140-A513-11D0-A3A4-00C04FD706EC}
{5984FFE0-28D4-11CF-AE66-08002B2E1262}={5984FFE0-28D4-11CF-AE66-08002B2E1262}

[{5984FFE0-28D4-11CF-AE66-08002B2E1262}]
PersistMoniker=Folder.htt
PersistMonikerPreview=%WebDir%\folder.bmp


1. Where "example. jpg" is, delete that and replace with your picture name for example "redrose.gif"
2. Put "desktop.ini" and your chosen picture in your Thumb Drive then Hidden it.
3. Refresh and Enjoy with your new background.
4. You can also try on C, D, E F drives.

If you liked it please leave a comment

November 21, 2009

How Enable Missing System restore in Windows XP


Some time due to modification in registry value system restore point is not able to display on system restore window.If similar is the case with you then here are few tricks to solve the problem. 


Solution 1:
The problem of missing System Restore is due to the corrupted or missing System Volume Information folders in each drive.
1. Go to each drive and look for these folders (these are system hidden and you will need to show hidden as well as system files to see these folders).
2. Rename the folder to something else like System Volume Info and restart the computer.
3. Delete these folders and restart the system again.
4. The new folders would have created by default and the System Restore would get restored.
Solution 2:
1. Type regedit in the Run box to open the registry editor.
2. Navigate to this key HKEY_LOCAL_MACHINE\SOFTWARE\Microsoft\Windows NT\CurrentVersion\SystemRestore
3. If a “DisableSR” value doesn’t exist, go to the Edit menu, select New, DWORD value, and create the value. Set the value to 1 to disable System Restore or 0 to enable System Restore.
4. Restart the system.
Now you Enabled system Restore point.

November 19, 2009

Microsoft has started bugging the users of non genuine copies of Windows. If you are also running a non genuine or pirated copy of Windows then there is a full chance of you getting this notification one day or the other.

The problem was reported by one of our viewers that when she updated her copy of Windows with Windows Update then her system started showing this notification that reads “You may be a victim of software counterfeiting” and “This copy of windows does not pass genuine Windows validation.


These notifications start coming back again after some time and do not feel good. Though I never encourage piracy but here is how you can remove this problem:

1. Before doing anything serious try restoring your system. If the problem is occurring after the Windows Update then System Restore will surely help.
2. But if it does not then do try this, launch Windows Task Manager.
3. Locate the process “wgatray.exe” and end it.
4. Log in into the Safe Mode and delete the file WgaTray.exe from c:\Window\System32
5. Also delete the WgaTray.exe from c:\Windows\System32\dllcache
6. Type regedit in Run to open Registry Editor, navigate to 
HKEY_LOCAL_MACHINE\SOFTWARE\Microsoft\Windows NT\CurrentVersion\Winlogon\Notify key.
7. Delete the folder WgaLogon and all of its contents.
8. Restart the PC normally.

Update:
Download this WGA remover tool called RemoveWGA.exe, just download it and run.

November 17, 2009

How to make Windows XP live CD

In this step by step guide we will learn how to make windows live CD with this windows live CD you can run XP directly from CD without installing it on hard disk. By this window live CD you can recover your system.

Complete these perquisite first

  • One windows XP bootable cd
  • One CD burning software Like Nero
  • Windows live CD Creator software
  • Windows Live CD plugin
  • 700 Mb Free space on C:\ drive
Now Follow this step by step guide

Create a folder named xpcd on c:\ drive


Copy the entire windows XP pro CD


Paste windows XP pro CD in xpcd folder


Now create a another folder named Plug_in


Download these plugin and put it in plug_in folder
Now Make a another folder named Live_cd


Now download this software and extract it in Live_cd folder


This ziped file contain following files


Now double click on pebuilder icon


On liesance agreement screen click yes In sources files give the location of C:\xp_cd or where you have copied your XP Cd. In media output options select create IOS image and give the location where you want to store this IOS file ( dont change file extension or file path unless you are a advance user ) Now click on plugin


Select Add options


Give the path of Plug_in folder and select the file xpe-1.0.7 and click open


diloag box will show file xpe-1.0.7 Click on Ok


Now Select Startup Group and Disable it


Now Select Nu2shell and Disable it also


Once you have disable both Nu2shell and Startup Group Click on Close Now Click on Build button


Now Windows Live CD creation process will start if this process is completed without any error you are almost done.


Note down the location where image file is saved


Now open your CD burning software I have used Nero. Choose burn image to disk options


Now select (from where you have stored in our previous steps) the xplivecd.iso image files to burns 

Let the nero burn image on CD


Congratulations!Once you have burn this CD you can use this CD on any computer note book disk less computer, what all you need is boot from CDROM option enabled.

Caution:-
It is a Windows Live CD so it will take time to launch windows dont be panic if it take times to load. Its depend on your system configuration and memory status. 


[via]

Change any XP User Password Without Having to Know the Old One

How to know every user account that exists on a Windows XP machine (even the ones that are hidden) ? And how to re-password any account without having to know the existing password ?

To view all of the user accounts:
  1. While logged onto the computer, click on Start > Run > and type in CMD
  2. From the command prompt window, type in net users. This will show you every account that is made onto the computer whether it is hidden or not.

To change an Windows XP account password:
  1. While logged onto the computer to an account that has administrative rights, click on Start > Run > and type in CMD.
  2. Type in net user then the name of the account then * and press enter.
    Example: net user administrator * or net user “John Miller” * (Put the name in quotes if it contains spaces)
  3. From there it should ask for a new password. Type in your new password and press enter (type very carefully and check your CAPS Lock because the command window won’t display what you type) and once more to confirm it. If you get the message that the command succeeded successfully you’ve changed the password.

November 13, 2009

Reset Administrator’s Password in Windows XP


If you have forgotten your Administrator’s password in Windows XP, then no need to worry about it as I am sharing a quick and easy method to reset it with you today. It is a common problem for all of us and not a serious case. Just follow the steps given below :


  1. Start your computer. When logon screen appears, press ctrl+alt+delete


  2. Now type as given below :
    User name : administrator
    Password :

    Keep password section as blank, don't type anything in it.


  3. Your computer will start now.


  4. To reset your forgotten password, Open registry editor (Press windows button + R to open it ).


  5. When registry editor opens, type cmd and press enter.


  6. Now type as given below :
    net[space]user[space]your user name[space]new password
    and press enter.
That’s it. If you face any problem, Please leave a comment here.


November 11, 2009

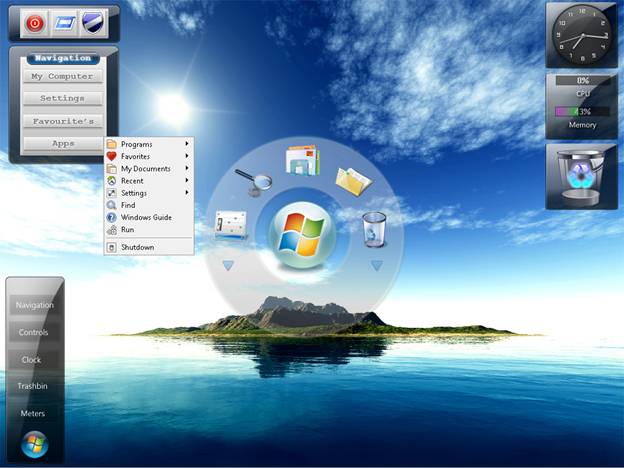
How to make windows XP look like Windows 7

Do you want appearance your Windows XP like Windows 7. At this time Windows 7 is available in beta version, but many Windows 7 Transformation Pack for Windows XP available in internet. Appearance of desktop of windows 7 much the same to like Windows Vista. there are some new applications at windows 7 that is Vienna explorer and pie dock.

How to make windows XP look like Windows 7
Download transformation packs software from link below and extract, all software in the transformation pack is collected from various source and made in one package. Here how to transform your Windows XP :


A. Windows se7en cursor

Go to cursors folder in the extracted folder and rick click mouse in install.inf file and then select install.
B. Windows se7en Boot Screen
In the package available two file of boot screen, boot screen for Windows Vista and Windows XP. Install it.
C. Windows se7en sound scheme
Copy all file in the sounds folder to /%system root%/media/ folder, and then setting up the sound from control panel.
D. Windows se7en Style
Install Styler software in the styles folder and then copy the skin to installed folder. Activate one off the skin.
E. Start menu
Run start menu in the start menu folder.
F. Logon Screen
Install user login screen file in logon screen folder.
G. Wallpaper
Available 12 Windows se7en’s wallpaper in wallpaper folder.
H. Windows se7en Themes
Copy “Windows 7 M1 VS” folder in theme folder and then copy to /%system root/resources/themes, and activate the theme by right clicking mouse in the desktop and select appearance tab and select windows seven themes. Click apply.
I. Vienna Explorer (Widows se7en Explorer)
Run Vienna Explorer in the Vienna Explorer folder. Tips : to run this software run automatically when windows XP start, right click the software in the desktop and check “run automatically when windows start” and then click ok.
J. Windows se7en Pie Dock
Run windows seven pie dock in pie dock folder.
K. Start Orb
This software to beautify start button. Run the software.
L. Windows se7en icon
Not available in this package. You can search the icon in the internet.
Tips : Hide all desktop icon by right clicking mouse then click “show desktop icon”


Windows 7 Login Screen for Windows XP

You wish really login screen which look like login screen at Windows 7? You must try “Windows 7 Default Login” from AskVG.com. This login screen just only for Windows XP user.Interest!! Download this file now. To install this login screen is easy and have available readme file that containing the way to install this login screen.

How to setup this logon Screen
  • Navigate to “\WINDOWS\Resources” and create folder with name Logon
  • Navigate to WideScreen or Normal Screen and copy the file “logonUI.exe” to Logon Folder
  • double click file “setup.reg”, click in Yes and Ok and Log off. To restore Windows XP Default’s logon click restore.reg.
you can also use third party software to install this login screen like tune-up utilities, style Xp or other.

Repairing and Fixing Windows XP System- Try XP Quick Fix Plus

XP Quick Fix Plus is free application provides 40 common Windows XP problems fixes (GUI mode) and command line utility to fix 6 common problems directly from command line. XP Quick Fix Plus Portable, small and fast and absolutely free.

XP Quick Fix Plus was made for Windows XP and was not tested on any other OS except Windows XP SP2 and XP Quick Fix Plus is relased as freware. This is good software you must have on your computer.
How to use XP Quick Fix Plus (GUI )
XP Quick Fix Plus
  • Download and unzip XP Quick Fix Plus to any folder and run it. Click LFX.exe to run GUI Mode
  • click on the button with the relevant fix. Some of the fixes may effect only after a restart.
The size of file XP Quick Fix Plus is very small, there are two files: LFX.exe (584kb) the main program GUI with 40 fixes and QFC.exe (38kb) a command line utility with 6 fixes.

November 7, 2009

Windows XP-System Restore

Before You Try System RestoreSystem Restore should only be used after trying less comprehensive methods of troubleshooting. System Restore changes many files and registry entries, and in some cases might replace more files than you want restored. 

Run problem applications in Compatibility Mode 
If system instability occurs after installing a particular application. To run the Program Compatibility Wizard:
Click Start, point to All Programs, point to Accessories, and then click Program Compatibility Wizard.

Use Add or Remove Programs to uninstall a problem application 

If the system instability has occurred immediately after a new application has been installed and running the program in Compatibility Mode hasn't helped. Although System Restore will remove the application if you choose to apply it, it is better to remove the offending application from Control Panel. 

 How to open Add or Remove Programs:
 
1. Click Start, click Control Panel, and then click Add or Remove Programs.
2. Click the program you want to remove, and then click Change/Remove.

If the system's instability has occurred immediately after a new device driver is installed, use the Device Driver Rollback feature instead of System Restore.

How to roll back to an earlier driver:
1. Right-click My Computer, and then click Properties.
2. On the Hardware tab, click Device Manager.
3. In the Device Manager dialog box, double-click the hardware that uses the driver in question.
4. In the device Properties dialog box, on the Driver tab, click Roll Back Driver.
Windows XP troubleshooters in the Help and Support Center. To open a troubleshooter:

1. Click Start, and then click Help and Support.
2. Under Pick a Help topic, click Fixing a Problem.
3. Under Troubleshooting problems in the right pane, click List of troubleshooters, and then start a troubleshooter by clicking the name in the left column of the table.


If, after trying these options the computer is still unstable, opt for System Restore. You'll want to save this option for last because the changes made to your computer are more comprehensive than if you simply uninstall a program or rollback a device driver.

To use the System Restore Wizard, make sure you're logged on as an administrator, and then follow these steps:
1. Click Start, point to All Programs, point to Accessories, point to System Tools, and then click System Restore.
2. On the Welcome screen, click Restore my computer to an earlier time, and then click Next.
3. On the Select a Restore Point page, select the date from the calendar that shows the point you'd like to restore to, as shown in Figure 2, and then click Next.


Figure 2
4. On the Confirm Restore Point Selection page, verify that the correct restore point is chosen, and then close any open programs.
5. Click Next if you are ready to proceed or click Back to change the restore point.
6. The computer will shut down automatically and reboot. On reboot, you'll see the Restoration Complete page, and then click OK.   

After reviewing the stability of your system, you can choose another restore point or undo this restoration. Just open System Restore and make the appropriate choice. After you use System Restore, you'll have an additional task, Undo my last restoration, on the System Restore Welcome page. Remember that you'll have to reinstall any programs that were installed after the restore point. 

If System Restore doesn't work in Normal Mode, it might work in Safe Mode. To use System Restore in Safe Mode, press the F8 key during reboot and choose Safe Mode.

How to Create Restore Points Manually

Only application installations that use a System Restore restorept.api-compliant installer will trigger the creation of a restore point. So it's a good idea to create a restore point manually before you install an application that you suspect won't have one a restorept.api-compliant installer. For example, before installing a screensaver you've downloaded from the Internet or a beta program from a software vendor, you should manually create a restore point. For more information, see the TechNet article, Windows XP System Restore.

To manually create a restore point:
1. Click Start, point to All Programs, point to Accessories, point to System Tools, and then click System Restore.
2. On the Welcome page, click Create a restore point.
3. On the Create a Restore Point page, enter a descriptive name for your restore point, as shown in Figure 3, and then click Create.


Figure 3 

The Restore Point Created page confirms that the new restore point has been created. I think it's a good idea to manually create a restore point before you download and install any application from the Internet.
Use Scheduled Tasks 

You can use Scheduled Tasks to create restore points at specified times. You might want to configure Scheduled Tasks to run System Restore at 6:00 P.M. daily, so that you always have a restore point available at the end of each working day.

To create a Scheduled Task, log on as an administrator, and then follow these steps:
1. Click Start, click Control Panel, click Performance and Maintenance, click Scheduled Tasks, and then double-click Add Scheduled Task.
2. Click Next on the first Scheduled Task Wizard page.
3. On the second page, click System Restore in the list of applications, and then click Next.
4. Continue through the wizard, specifying the days and times to run System Restore.
5. When prompted, type in the user name and password for an administrator of the system, and then click Finish. Scheduled Tasks starts each time you start Windows XP and runs in the background.

 
Troubleshoot System Restore
Some common problems that could cause System Restore not to work properly and their solutions include the following:
There is less than 200 MB of free space available on the computer—free up some space on the hard drive by deleting unused files or images.
After rebooting, the restoration is unsuccessful—choose an earlier restore point and try again.
Restoration was denied due to non-administrator status—log out and then back in as an administrator.
The System Restore Service is not running—Open Administrative Tools, click Computer Management, and then click Services and Applications. Click Services, and double-click System Restore Services from the list. Verify the service is started and running. If not, under Service status, click Start and change the startup type to Automatic. 

 
System Restore is no substitute for regularly backing up your data. System Restore comes into play when your computer becomes unstable. System Restore can't be used if your hard drive fails or is melted down in a fire, because the information that System Restore uses is stored on the hard drive itself. To create regular backups of your data and computer system state, use the Backup utility in Windows XP.

To open Backup:
Click Start, point to All Programs, point to Accessories, point to System Tools, and then click Backup. 

 
When you use Backup, save the backup information to a disk or an external drive for safekeeping. If there's a catastrophic failure, such as a hard drive crash, this backup can be used to restore the data after the hardware repair is complete.

DOWNLOAD -System Restore on Windows Vista and XP Guide in PDF format