December 5, 2009

Steps to Remove Virus MediaControl.exe

MediaControl.exe is the recent virus which has been affecting a lot of computers all over. It renames media files like mpg, mp3, avi, dat, mpeg etc. to jpg extension. Note that only extension will be changed and not the file format. This process mediacontrol.exe will be running all the time converting the file extensions to jpeg format and hence you will see all your mp3 and avi getting converted to .jpg, but you cannot open them on image editors. You can open them on your normal media players irrespective of the .jpg extension.

Steps to Remove Mediacontrol.exe

1. Open task manager [alt+ctrl+del] and move on to processes tab, find mediacontrol.exe. End Process. More on using task manager to kill virus here.

2. Now, Start > Run [keyboard shortcut: Winkey + R] > type msconfig > ok. Move to startup tab, find the mediacontrol.exe and uncheck it.

3. Goto System32 folder in C:\Windows [mostly, may vary based on your OS installation], find folder Mcont and delete. If not possible, you may need to use unlocer to delete the folder. Details here. If you fail in this step, you may start your computer in safe mode and try again.

4. Now, you have cleared your computer from virus. Its time to undo all changes it has done. Use Extension Renamer utility to rename file extensions back to their original file extensions. Some prior knowledge is requried for this about the type of file. You will find it difficult if you have kept all your songs and movies in a single folder.

Note: This virus may also be found in these names: 81308957.EXE, 39715419.EXE, 32454595.EXE, COPY.EXE, MEDIACONTROL.DOC, 23073198.SVD, 63532069.SVD. The file size may vary from 270 to 290kb.


Steps to Add Watermark to Your Images with Siotra Watermark

Siotra Watermark is a small and free application using which you can add watermark to your images very easily. The program is very easy to use and comes with some options that you can configure.


Just run the application and select the folder which contains the images that you want to watermark. Select the watermark text, the destination and click the “Create” button. You can also set a default text that you want to include in all your watermarks. You can also include the year and filename in the watermark and can also set the size and alignment of the watermark. The font of the watermark can also be configured and you can save the settings so that they can be used each time.

The program is a freeware and works on Windows XP/Vista and Windows 7 and requires .Net Framework 3 or higher.

Steps to remove recycler virus from your thumb drive


This virus has been widely spread these days and it has become very common that every pen drive we use will be infected by this virus. This Recycler virus / BV:AutoRun-G[Wrm] is very annoying one and even formatting the pen drive will not remove the virus. Though antivirus software is able to identify, it cannot remove the virus completely. If you delete this manually, it will again create itself and none of the virus removal tricks could work to resolve the problem.
  • Download Flash Disinfector and save on some non windows drive.
  • Double click on it and it will ask you to insert USB flash drive and click ok. Do so.


  • Clicking on ok will make your desktop go blank, don’t worry, its normal.
  • It will fix the autorun.inf virus and you are done partially. Yes, its a partial solution, it will lock the autorun file and you will see some file created by flash disinfector. If you remove the file, the virus get re activated. May be some future update of our antivirus softwares will have complete fix for this.

Steps to connect SATA Hard Drives to your old Computer

IDE to SATA Converter
IDE To SATA Ultra ATA 100/133 Converter Adaptor.Make your old IDE MotherBoard use SATA Device

What is IDE to SATA Converter?

IDE Interface (Parallel ATA) to next generation SATA (Serial ATA) converter turns your OLD IDE motherboard into NEW Serial ATA (SATA) host Plug directly into your motherboard's IDE port, this device converts the IDE signals into Serial ATA ones to allow the use of Serial ATA hard disk drives (if your HDD is SATA).

Type 1.


Type 2

Type 3

Specifications

This card supports the Serial ATA (Generation 1) transfer rate of 1.5Gb/s (150MB/s)
48 bits LBA. Support large hard drives of 137 GB or larger with one partition
Plug and Play, no drivers required
Compatible with any OS (Windows, DOS, Mac, Linux, UNIX) that supports IDE storage devices Package include 1 x IDE to SATA Converter, 1 x Power Lead, 1 x SATA Cable

You can purchase from your nearer sales centre

Or you can purchase from Radiff shopping

Steps to Make a "Phone-O-Scope" SLR Lens for Your Mobile Phone


Mobile cameraphones are really handy to have, but extra functions like zoom and focus are typically lacking. My friend decided to attach an SLR lens to his smartphone, and the results are actually pretty slick.


My friend used an iPhone for his DIY project, but the idea should work just about any smartphone that has a built-in camera. He calls it the Phone-O-Scope, a smartly cobbled together out of things you may already have laying around the house (assuming you also have an SLR lens from a full-size camera).

Using little more than a cardboard tube, some sticky putty, duct tape (of course!), and a couple of PVC pipe couplers, he made his Phone-O-Scope for a mere 10 bucks. Check out his blog post for step-by-step instructions on how he did it.

Read more

http://cow.mooh.org/2009/12/phone-o-scope-attaching-slr-lenses-to.html

Steps to install PCI VGA(AGP) Card to Computer Mother board

One of the easiest installs on your computer is to install PCI cards. There are about a million different types of PCI cards.

To install PCI cards, you need to:

  • Unplug your computer from the wall and remove your computer's case cover so that you have plenty of room to work. More on this here. Also have your antistatic wristband on because PCI cards are VERY sensitive to static electricity.

  • Locate your PCI card slots (labeled A) on your motherboard. Then use a screwdriver to remove the screw (labeled B) holding the PCI slot cover. Once removed, set aside the screw, you'll need that later!
  • Align your PCI card with the slots on the motherboard and make sure the hole in the face of the PCI card lines up over the hole which you removed the screw.
  • Now to install the PCI slot card, firmly press down on it until it is in position. Finally, replace the screw that you removed before to secure the PCI card into place.
  • Troubleshooting a PCI card install


  • Plug your computer back in and turn it on. Your computer should detect the new card and be prepared to install any new drivers.

  • Here are a couple tips if you have trouble when you install your PCI card.

    • If your computer doesn't turn on make sure the power cable is plugged into the wall and plugged into the computer's power supply.
    • After installing your PCI card, if your computer turns on but beeps a couple times and the operating system does not load, repeat the install process but try the PCI card in different slots on the motherboard, it is possible that you have a bad slot.
    • If all else fails when you install your PCI card, contact its manufacturer for more help.

    How to Keep Your Software Running As It Is After Formatting Hard Disk

    In order to restrict software installed or control the number of activation allowed in one particular computer, the volume serial number has been used by software developers to track where and how many times the software has been installed. Volume serial number is unique and it will be changed whenever the hard disk is formatted.

    If you would like to restore your PC image back to your hard disk after it is formatted, you may run into the problem of not able to run some software due to not able to recognize the old volume serial number.

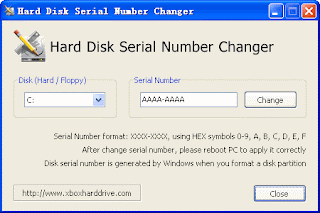
    To get this issue solved, there is one utility, named as Hard Disk Serial Number Changer that can change your volume serial number back to previous serial number.

    Hard Disk Serial Number Changer is freeware and handy to use. It can change the volume serial number to what you preferred. Prior to format your hard disk, remember to write down the volume serial number so that you can change the volume serial number back to previous one after it is formatted. If you are not sure where to get the serial number, just go to command prompt, then type dir and press enter, the volume serial number is listed as shown below:

    C:\Documents and Settings\Administrator>dir
    Volume in drive C is OSDisk
    Volume Serial Number is 12AF-AABB

    Once you have changed the volume serial number, you must need to reboot your computer in order for the changes to be effective.

    Hard Disk Serial Number Changer works perfectly with file systems like NTFS, FAT and FAT32 and is compatible to run in Windows Vista/XP/ME/2000/98/2003/NT. If you plan to format your hard disk but still plan to ensure its software compatibility, this tool is definitely useful and worth getting one.

    Steps to Convert Files from one format to Different Formats


    There are many freewares that can help to do document conversion but in case you are not comfortable to download one for temporary use in local PC system, you may want to try this online service that serve the same purpose. The website, named as cometdocs offers free online conversions for more than 50 formats that make it a powerful tool for both office and personal use.

    Features
    The service is totally free of charge and what users need to do is just visit Cometdocs followed by three simple steps.
    1.First, choose a file by browsing from your local drive.
    2.Then, select a type of file to be converted from a list of recommended conversion format. Good thing is, the online service is smart enough to help identifying the unknown or unusual file format with suggested lists for quick conversion.
    3.Once completed, key in the email address that you want this converted file to be sent to and you will be surprised to receive the converted copy almost instantly.


    Since this is web based service, the conversion latency will be affected by how stable your internet service is especially when trying to upload the file to the server. Nevertheless, it is quite a handy tool in view of its wide range of conversion formats available for selection as compared to other solutions.

    Link:http://www.cometdocs.com/


    Free Rapidshare Premium Link Generators

    Rapidshare offers you with Free & Premium services to download files using their servers and for these services you need to make payments via paypal or other payment processors and get the maximum download speeds with multiple download features.

    Originally called as the Premium Zone where your files are never deleted, instant download of files without any time lag, parallel downloads, download accelerator support, resuming broken downloads, extra storage space if servers are full.


    Rapidshare SearchIf you are looking for ways where you can generate premium links for free of cost. These sites will allow you to download files from RapidShare with all premium features, but without the expense!. You just need to insert your URL and the generator will create a valid premium link for you; a link ready for download that can be resumed, paused, accelerated and more.

    List of different Rapidshare Premium Link Generators :

    1. Rapidshare Pre
    2. RS Generator
    3. Rapid Unblock
    4. Very Rapidshare

    Skip RapidShare Download Limits & Waiting Timer

    Everyone seems to be downloading more from rapidshare and less from other download services like Megashare, Megaupload etc and this is because its one of the best service which offers two modes – one free and second one paid in which you dont have to wait for downloading your files and you get the speedy servers
    which would allow you to download the files quickly.

    Now while you need to download a small bunch of files iam sure you wont be interested in buying a new paid account which is why iam going to tell you a small trick which would allow you to skip the rapidshare timer and also the download limits.

    There are many programs which work as Rapidshare download managers but this one seems to be the best one because it allows you to download multiple files at once from Rapidshare.


    Basically it uses multiple proxy servers and starts downloading the files and works with both rapidhsare.de & rapidshare.com hosted files.


    You dont have to pay anything for the software because its totally free and since its a download manager in itself, you dont have to load links one by one and start downloading multiple files at once. So dont start searching for any other tool and grab the grabber now

    Steps to Remove W32/Sality Virus

    What is Sality Virus?

    Sality is a virus that has backdoor capabilities and executes keylogger and may infect executable files by putting its code to host files.

    How it will affect your Computer
    ?

    1.Sality virus will infect local executable files and delete all files that are associated with anti-virus and anti-spyware applications, as well as firewalls.

    2.Sality runs a keylogging module that gathers all system and network information, records passwords and login names, steals all sensitive information and sends all this collected data to a predefined email address.

    3.Sality opens a backdoor that allows the remote attacker to get the full control over the infected computer and this places any financial or banking information stored on your computer in severe jeopardy and represents a serious security risk.

    4.It downloads further malware from the following domains:
    • bpowqbvcfds677.info
    • aapowqbvcfds677.info
    • abpowqbvcfds677.info
    • d98dc9.bpowqbvcfds677.info
    • bmakemegood24.com
    • d99395.bmakemegood24.com
    • bbeakemegood24.com
    • bperfectchoice1.com etc.......
    It also disables Registry Editor and Task Manager by adding these registry entries:
    HKCU\Software\Microsoft\Windows\CurrentVersion\Policies\system\DisableTaskMgr = dword:00000001
    HKCU\Software\Microsoft\Windows\CurrentVersion\Policies\system\DisableRegistryTools = dword:00000001


    Sality Manual Removal Instructions

    Note: This manual removal process may be difficult and you run the risk of destroying your computer.

    Step 1 : Use Windows File Search Tool to Find Sality Path

    • Go to Start > Search > All Files or Folders.
    • In the "All or part of the the file name" section, type in "Sality" file name(s).
    • To get better results, select "Look in: Local Hard Drives" or "Look in: My Computer" and then click "Search" button.
    • When Windows finishes your search, hover over the "In Folder" of "Sality", highlight the file and copy/paste the path into the address bar. Save the file's path on your clipboard because you'll need the file path to delete Sality in the following manual removal steps.

    Step 2 : Use Windows Command Prompt to Unregister Sality DLL Files
    • To open the Windows Command Prompt, go to Start > Run > type cmd and then click the "OK" button.
    • Type "cd" in order to change the current directory, press the "space" button, enter the full path to where you believe the Sality DLL file is located and press the "Enter" button on your keyboard. If you don't know where Sality DLL file is located, use the "dir" command to display the directory's contents.
    • To unregister "Sality" DLL file, type in the exact directory path + "regsvr32 /u" + [DLL_NAME] (for example, :C\Spyware-folder\> regsvr32 /u Sality.dll) and press the "Enter" button. A message will pop up that says you successfully unregistered the file.
    • Search and unregister "Sality" DLL files: syslib32.dll, sysdll.dll, oledsp32.dll

    Step 3 : Detect and Delete Other Sality Files
    • To open the Windows Command Prompt, go to Start > Run > type cmd and then press the "OK" button.
    • Type in "dir /A name_of_the_folder" (for example, C:\Spyware-folder), which will display the folder's content even the hidden files.
    • To change directory, type in "cd name_of_the_folder".
    • Once you have the file you're looking for type in "del name_of_the_file".
    • To delete a file in folder, type in "del name_of_the_file".
    • To delete the entire folder, type in "rmdir /S name_of_the_folder".
    • Select the "Sality" process and click on the "End Process" button to kill it.
    • Remove the "Sality" processes files: syslib32.dll, sysdll.dll, oledsp32.dll, oledsp32.dll, sysdll.dll, syslib32.dll

    Other simple way, you can use Sality Removal Tool from Grisoft by downloading at Here.

    Kaspersky Virus Removal Tool 2010-Free

    Another virus scanner and detection software from Kaspersky.

    The Kaspersky Virus Removal Tool application was designed to be another virus scanner and detection software from Kaspersky. The produst will scan the specified locations for any virus threats and remove them or send to Quarantine folder.


    You Can View More Screen Shots Here

    Download - Free Kaspersky Virus Removal tool

    How to fix registry problems-Manually

    GENERAL INFORMATION :
    The Registry is a database used to store settings and options for the 32 bit versions of Microsoft Windows including Windows 95, 98, ME and NT/2000. It contains information and settings for all the hardware, software, users, and preferences of the PC. Whenever a user makes changes to a Control Panel settings, or File Associations, System Policies, or installed software, the changes are reflected and stored in the Registry. There are six main arms of Registry Editor, each containing a specific portion of the information stored in the Registry.
    HKEY_CLASSES_ROOT
    HKEY_CURRENT_USER
    HKEY_LOCAL_MACHINE
    HKEY_USERS
    HKEY_CURRENT_CONFIG
    HKEY_DYN_DATA

    Each registry value is stored as one of five different data types:
    REG_BINARY
    REG_DWORD
    REG_EXPAND_SZ
    REG_MULTI_SZ
    REG_SZ


    HOW TO OPEN REGISTRY EDITOR :
  • Please go to “Start” and then click on “Run
  • Now in the Run command box, type “regedit“, and then click on “OK


    This option will open the Registry Editor, there you can delete and modify the Registry Entries..
    HOW TO DELETE / MODIFY REGISTRY ENTRY :
    As you know now, “regedit” option opens the Registry Editor, so now you just need to modify / delete the infected or corrupted registry entries.
    But before do this, RemoveOnline strongly recommends that be careful while removing any of Registry entries / System files. Incorrect changes and removal to the System file and registry can result in permanent data loss, PC damage or corrupted files


    There is no problem to find out any Registry Entry, if you know what you are looking for. Otherwise you can search the registry key with the search option of Registry Editor. And for this, just Press “Ctrl + F” to locate the key that contain the value you want to delete or modify.


    How to Un-Register DLLs files.-Manually

    GENERAL INFORMATION :

    DLL (Dynamic Link Library) refers to a type of file that is stored either locally or remotely and is a collection of commands and/or data which can be shared by different programs on the same platform.

    Typical DLL files contain commands and/or data that are common to a certain task, for instance Windows has many DLL files built-in which other programs access and utilise. A common example of this is spool32.dll which is used for printing control within Windows 95/98 by other applications.

    HOW TO UN-REGISTRY DLL FILE :

  • Please go to “Start” and then click on “Run
  • Now in the Run command box, type “cmd“, and then click on “OK
  • Type “regsvr32 /u filename.dll” where “filename” is the name of the file that you like to Unregister.
  • See the example below …

    HOW TO SEARCH FILES AND FOLDERS:

    1. Click Start, and then click Search.
    2. In the Search Companion dialog box, click
      All files and folders
      .
    3. Type part or all of the name of the file or folder, or type a word or phrase that is in the file.
    4. In the Look in box, click the drive or drives, folder, or network location that you want to search.
    5. Choose one of the following options:
      1. Click When was it modified to look for files that were created or modified on or between specific dates.
      2. Click What size is it to look for files that are specific size.
      3. Click More advanced options to specify additional search criteria.
    6. Click Search

    Steps to Remove fake Security Application Cyber Security


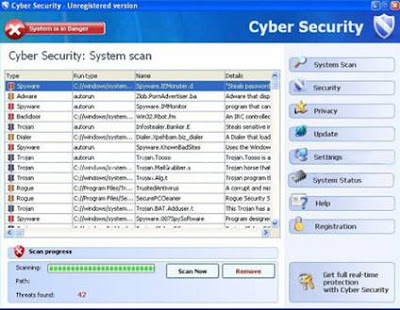
    Cyber Security is another fake security application that acts like a prevention tool that protects your PC from spyware or virus but it’s not. It is only a part of fake security application and asks for money to have the infection removed.

    Risk Level : High ( Dangerous )
    See figure below-Fake Application Cyber Security Screenshot


    Note :- To safely & quickly detect Cyber Security, We highly recommend you to use the Removal Tool for Cyber Security.
    Manual Removal Instruction can help you to Remove this Infections

    1.Terminate the Spyware Processes tsc.exe from TaskManager

    2.Search and Get Rid of all these Files and Folders[Read More]

    c:\Documents and Settings\All Users\Start Menu\CS
    c:\Documents and Settings\All Users\Start Menu\CS\Computer Scan.lnk
    c:\Documents and Settings\All Users\Start Menu\CS\Cyber Security.lnk
    c:\Documents and Settings\All Users\Start Menu\CS\Help.lnk
    c:\Documents and Settings\All Users\Start Menu\CS\Registration.lnk
    c:\Documents and Settings\All Users\Start Menu\CS\Security Center.lnk
    c:\Documents and Settings\All Users\Start Menu\CS\Settings.lnk
    c:\Documents and Settings\All Users\Start Menu\CS\Update.lnk
    %AppData%\Microsoft\Internet Explorer\Quick Launch\CS.lnk
    %UserProfile%\Desktop\Cyber Security.lnk
    c:\Program Files\Common Files\CSUninstall
    c:\Program Files\Common Files\CSUninstall\Uninstall.lnk
    c:\Program Files\CS
    c:\Program Files\CS\tsc.exe
    c:\WINDOWS\system32\iehelpmod.dll

    3.Delete and Modified All These Infected Registry Entries [Read More]

    HKEY_CURRENT_USER\Software\Microsoft\Windows\CurrentVersion\uninstall\CS
    HKEY_CLASSES_ROOT\CLSID\{35A5B43B-CB8A-49CA-A9F4-D3B308D2E3CC}
    HKEY_LOCAL_MACHINE\SOFTWARE\5FFB10D58FFCF482208906E6A889FD56
    HKEY_LOCAL_MACHINE\SOFTWARE\Microsoft\Windows\CurrentVersion\Explorer\Browser Helper Objects\{35A5B43B-CB8A-49CA-A9F4-D3B308D2E3CC}
    HKEY_CURRENT_USER\Software\Microsoft\Windows\CurrentVersion\Run “CS”

    If you find difficulty You can also use CCleaner for Clean the Registry Errors


    Thats it....Know your computer is out of danger

    Or you can use trial Version of Removal tool

    Download – Removal Tool for CyberSecurity