January 5, 2010

How to Reset Waste Ink Counter in Epson Stylus T10


After Ink Absorption is full epson stylus printers gives error message  Waste ink tank full replace the ink tank.
Steps to Reset Waste Ink Counter in Epson

  1. Download Restter Program for T10 (RAR file)!
  2. Extract the file
  3. Turn on the printer and connect the cable
  4. Click Loader.exe to run program
  5. On License Agreement window, click Accept button
  6. Click Select button
  7. Select the printer model
  8. Select auto detection on Port menu
  9. Click Particular Adjustment Mode Select Maintenance>Waste Ink Pad Counter
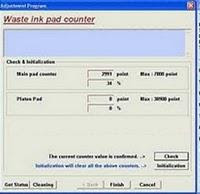

  • Click Check button to show the counter value
  • Click Initialization button and wait until the operation is completed
  • Turn of the printer when you order to do so
  • Click OK button
  • Wait until an order to turn on the printer shows
  • Turn on the printer
  • Click OK button
  • Last, click Check button to ensure that the operation is successful. 
Exit adjustment program and operate your printer normally

    How to Fix Invalid Boot.ini Error while windows Loading

    In some cases booting the computer in normal mode, you can see this error message in certain cases saying that “Invalid Boot.ini, loading from C:\Windows.So here is the solution to fix this error.


    The error comes up while booting but after this windows loads normally.

    Reason for This Error 

    The problem is caused due to corrupted boot.ini file which is usually located in the C drive.

    Steps to Fix Boot.ini Error

    We can fix the problem by providing the same boot.ini file with predefined properties.


    1.Right click on My Computer ->Go to Advanced ->Click on  Startup and Recovery, click Settings.

    2. Now click on Edit button besides the line reading “To edit the startup options file manually, click Edit”.
     3.This will open the boot.ini file  if it isn’t there then click OK to create a new.

    4.Now copy and paste the following code in it
    -------------------------------------------------------------------

    [boot loader]
    timeout=30
    default=multi(0)disk(0)rdisk(0)partition(1)\WINDOWS
    [operating systems]
    multi(0)disk(0)rdisk(0)partition(1)\WINDOWS=”Microsoft Windows XP Professional” /fastdetect
    --------------------------------------------------------------------

    5. Click save and exit.
    6. A fresh file boot.ini will be created in the C drive, now we have to apply system attributes.      
    7. Open command prompt (type cmd in Run box).

    8. Type the following command

             attrib C:\boot.ini +s +h and Hit Enter.

    9.The problem is fixed.

    So just restart the pc to check the fix applied or not